

Your 1950s Cape Cod kitchen has character and charm. But it probably needs some serious updates to work for your family today.
Maybe your counters are cracked laminate. Your cabinets feel cramped. The lighting is dim. Sound familiar?
You’re not alone. Thousands of homeowners face this same challenge. How do you modernize a vintage kitchen without losing what makes it special?
This article shows you exactly how to do it. You’ll see real before and after photos, specific renovation ideas that work, ways to keep authentic Cape Cod style, and modern updates that make sense.
We’ve helped families through this process for years. We know which changes add value and which ones you’ll regret. Our advice comes from real projects, not just pretty pictures.
Your kitchen can be both functional and faithful to its 1950s roots. Let’s show you how to make it happen without breaking the bank or losing that cozy Cape Cod feeling you love.
Recognizing Your 1950s Cape Cod Kitchen: Before the Remodel
I’ve seen hundreds of these kitchens. Yours probably looks familiar.
Authentic 1950s Cape Cod Kitchen Features
Your kitchen was built for smaller families. Simpler times.
Here’s what I usually see:
- Compact layouts that feel cramped
- Wooden cabinets with basic hardware
- Worn laminate counters
- Checkerboard linoleum floors
- Tiny windows with little light
The dining room sits completely separate. No connection at all.
Common Issues in Original 1950s Cape Cod Kitchens
Storage is your biggest problem. Modern gadgets don’t fit anywhere. The electrical system can’t handle today’s appliances. Counter space? What counter space?
Everything feels dark and closed off. Like cooking in a cave.
Elements Worth Preserving
Not everything needs to go.
Save the beadboard paneling. That’s authentic character you can’t buy. Your solid wood construction beats modern cabinets. Check under that linoleum – there might be beautiful hardwood.
Keep good hardware and the room proportions. They add real value.
Planning Your 1950s Cape Cod Kitchen Transformation
Don’t pick colors yet. Think structure first.
Assessing Structural Possibilities
Those walls between the kitchen and dining room – are they load-bearing? You might have options. Your plumbing and electrical systems need updates anyway. Now’s the time to move things.
Tiny windows could be bigger. Floor plans aren’t set in stone.
Preservation vs. Modernization Decisions
My rule: If it’s sound and looks good, restore it. If it’s worn out, replace it.
Keep the character. Update the function. Modern conveniences don’t kill Cape Cod charm. Think about aging in place, too.
Layout Transformations: Before & After
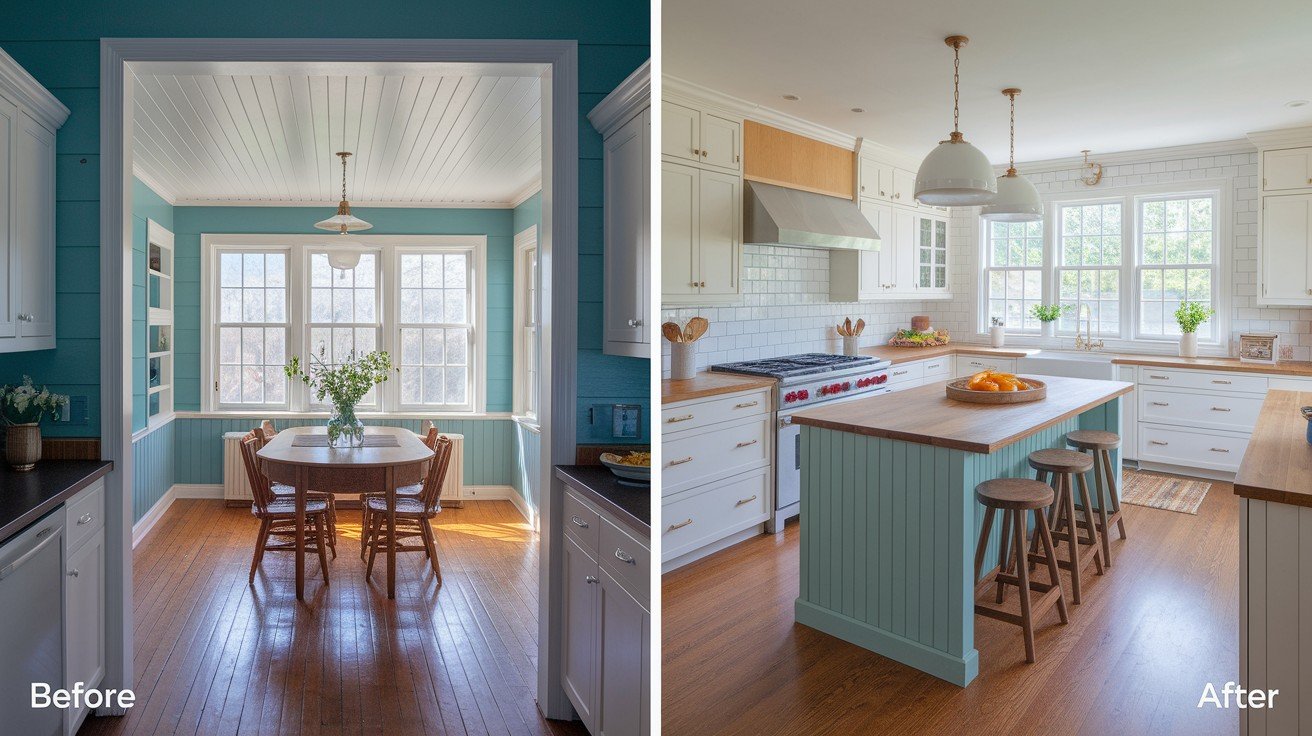
The biggest change you can make? Opening up your closed-off 1950s kitchen to create flow and connection.
Before: Closed-Off 1950s Kitchen Layout
Your kitchen is isolated. You cook alone while the family gathers elsewhere.
The formal dining room sits empty. Traffic jams everywhere.
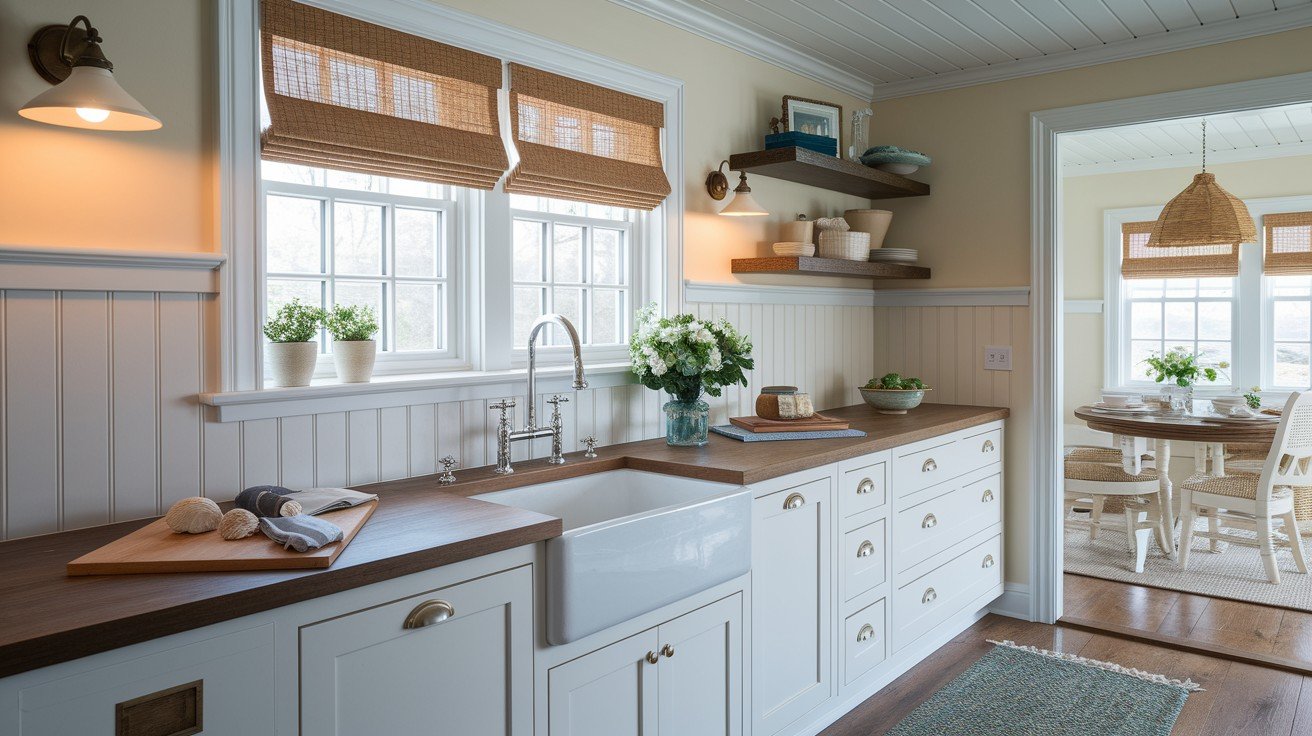
After: Open Concept Integration
Remove the wall between the kitchen and the dining room. Suddenly, you have space and light. Your kitchen island becomes the heart of your home. People gather there naturally.
Keep those cozy Cape Cod proportions while gaining connection.
Specific Layout Improvements
U-shaped layouts maximize counter space. L-shaped works with a peninsula.
Put breakfast nooks by bigger windows. Connect to mudrooms for storage.
Lighting Transformations: Before & After
Poor lighting makes your 1950s kitchen feel smaller and darker than it is. Let’s fix that.
Before: Limited 1950s Lighting
One overhead light. That’s it.
Tiny windows don’t help. Dark corners everywhere.
After: Maximized Natural Light Solutions
Bigger windows first. Or new ones where there weren’t any.
Skylights open everything up. Remove upper cabinets for window space. Light surfaces reflect and bounce light. Add task lighting under cabinets.
Cabinet and Storage Transformations: Before & After
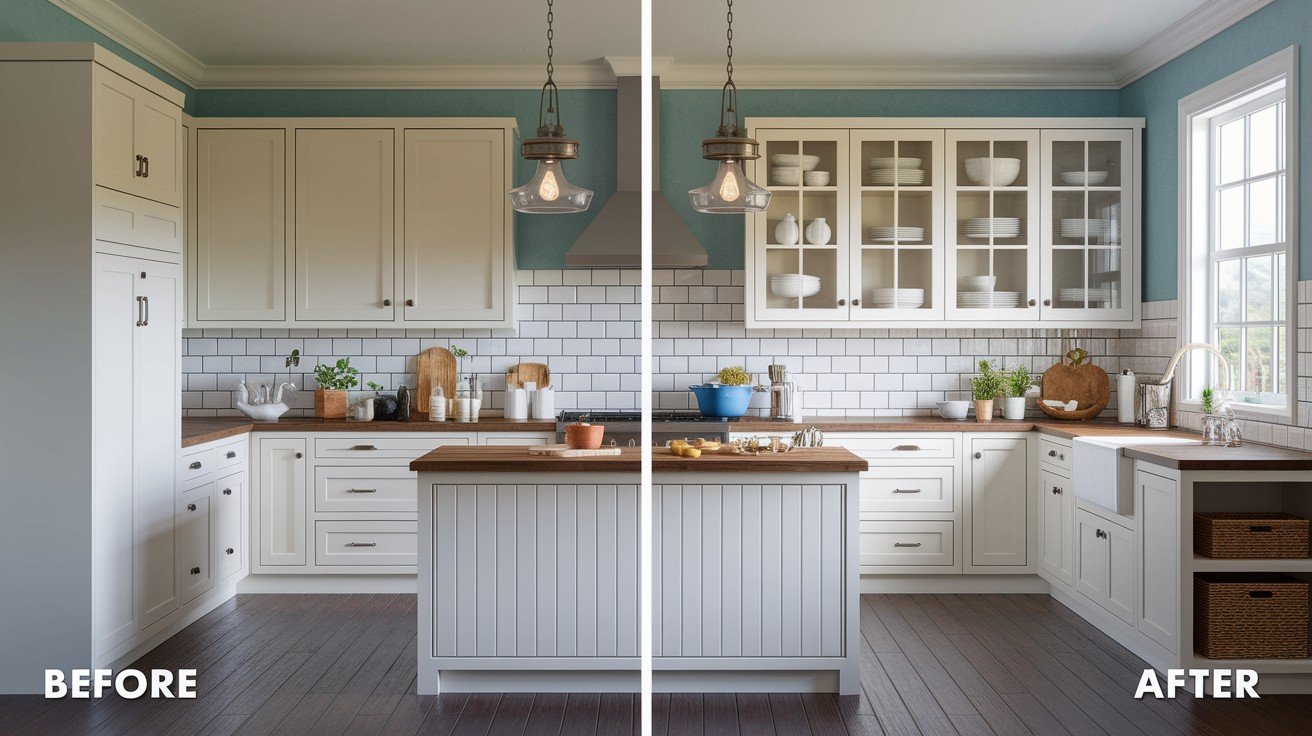
Your 1950s cabinets can’t handle modern family needs. Time to create storage that works.
Before: Original 1950s Cabinetry
Basic cabinets that stop short of the ceiling. Wasted space everywhere.
Simple doors. Chaos inside.
After: Updated Storage Solutions
Shaker-style cabinets in white or soft colors. Floor-to-ceiling storage.
Mix closed cabinets with open shelving. Pull-out drawers inside. Glass-front doors show nice dishes. Beadboard inside for authentic detail.
Creative Storage Additions
Kitchen islands become storage powerhouses. Pot racks keep cookware handy.
Corner solutions fix awkward spaces. Built-in pantries change everything.
Surface Material Upgrades: Before & After
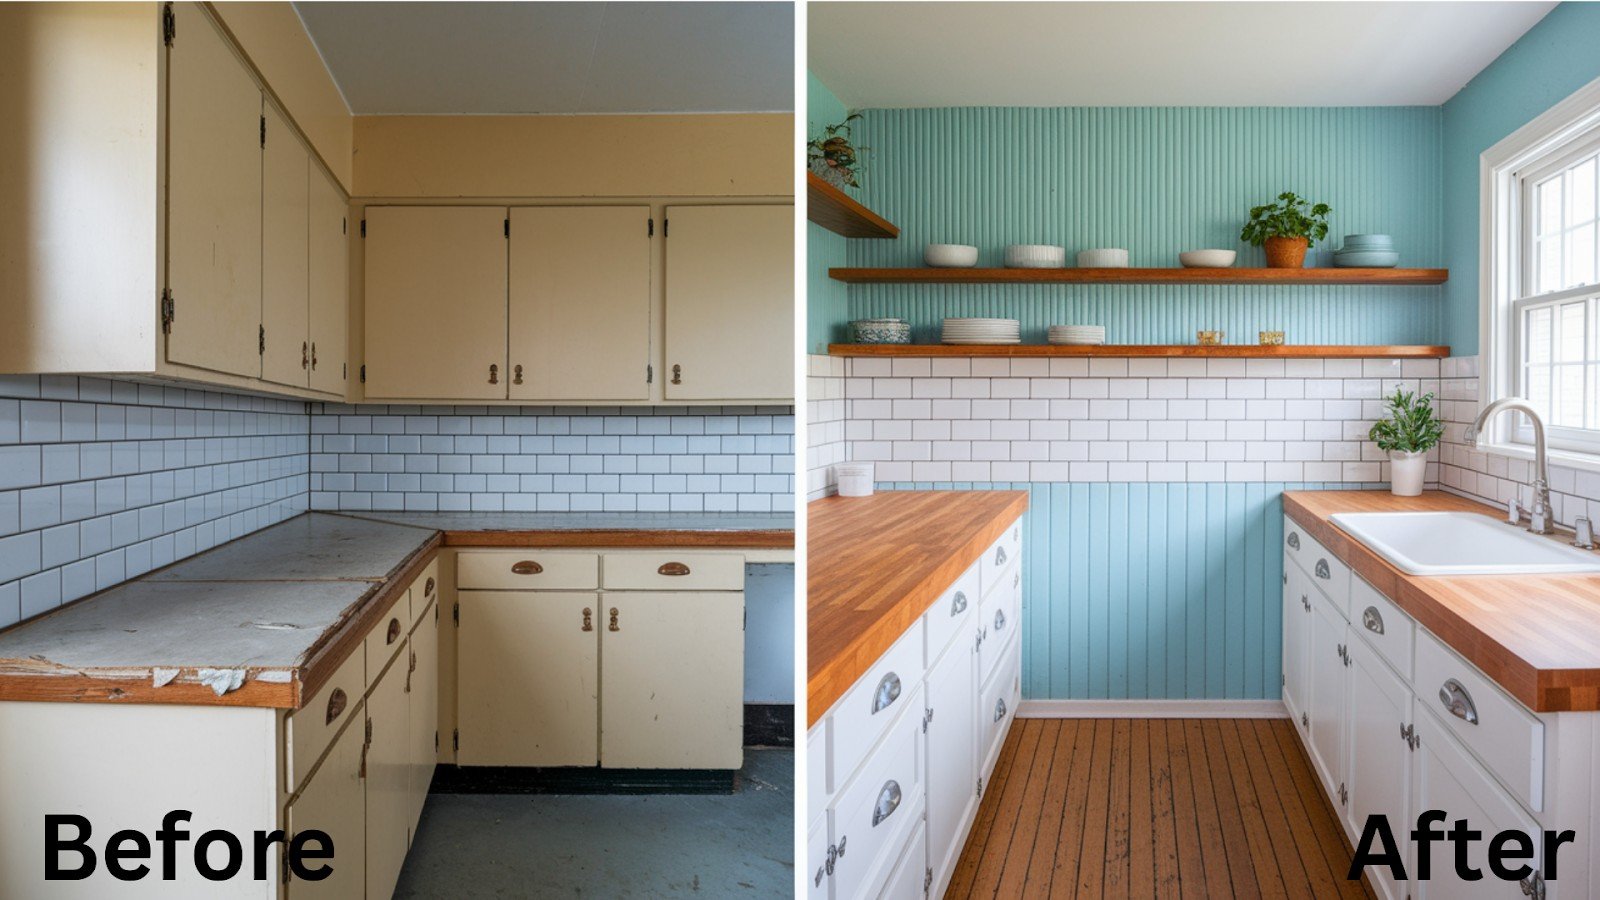
Worn surfaces age your kitchen faster than anything else. Quality materials transform the entire look.
Countertop Transformations
Before: 1950s Standard Surfaces
Chipped laminate that can’t handle heat. Function only, no style.
After: Modern Durable Options
Quartz for durability. Butcher-block for warmth. More space overall.
Backsplash Updates
Before: Basic white tiles. Just functional.
After: Beadboard paneling for texture. Subway tiles in soft colors. Ocean-inspired patterns.
Flooring Refinements
Restore those hidden hardwood floors. Replace linoleum with period-appropriate materials.
Finishing Touches and Authentic Details
Small details separate amateur renovations from professional results. These touches make your kitchen truly Cape Cod.
Hardware and Fixtures
Cabinet hardware sets the tone. Farmhouse sinks scream Cape Cod.
Traditional faucets with modern functions. Light fixtures that work.
Decorative Elements
Beadboard wainscoting on walls. Natural window treatments.
Subtle nautical touches. Display areas for coastal accessories.
Real Transformation Examples

Seeing actual before-and-after results helps you visualize what’s possible. These real projects prove it works.
Case Study: Madison, Wisconsin 1950s Kitchen
The family wanted to age in place. We kept the character but added accessibility.
Modern conveniences are everywhere. Cost-effective, smart choices.
Common Transformation Results
Home values increase. Families use the kitchen now.
Historical character stays strong. Social spaces bring people together.
Conclusion
Your 1950s Cape Cod kitchen doesn’t have to stay stuck in the past. You can have both vintage charm and modern convenience.
The key is making smart choices. Keep the beadboard paneling. Update those worn countertops. Open up the layout but maintain the cozy proportions. Choose colors that honor the coastal style.
Every change should serve a purpose. Don’t update just to update. Focus on improvements that make your daily life easier while respecting the kitchen’s original character.
Remember, this is your home. Trust your instincts about what feels right. The best 1950s Cape Cod kitchen remodel is one that works for your family’s needs today.
Ready to start planning? Take another look at those before and after examples. Your dream kitchen is closer than you think.
FAQs
What makes a 1950s Cape Cod kitchen unique?
Compact layouts, wooden cabinets, laminate countertops, checkerboard floors, limited natural light, and separated dining areas define authentic 1950s Cape Cod kitchen design.
Should I keep the original 1950s kitchen elements during remodeling?
Preserve solid wood construction, beadboard paneling, authentic hardware, and room proportions while updating worn surfaces, appliances, and inefficient storage systems.
How much does a 1950s Cape Cod kitchen remodel typically cost?
Costs vary based on scope, materials, and location. Semi-custom cabinets and strategic updates offer budget-friendly options without compromising authentic character.
Can I create an open floor plan in my 1950s Cape Cod kitchen?
Yes, removing non-load-bearing walls between the kitchen and dining areas improves flow while maintaining cozy Cape Cod proportions and character.
What colors work best for a modernized 1950s Cape Cod kitchen?
White cabinets with soft blues, greens, sandy neutrals, or sea glass colors create an authentic coastal atmosphere while updating the original palette.