

Ready to transform your space with a custom lighting solution that perfectly matches your style?
Creating a DIY lampshade is one of the most rewarding home projects you can tackle, and it’s far simpler than you might think!
Forget spending hundreds on designer lighting fixtures. With just a few basic materials and about an hour of your time, you can craft a personalized lampshade that reflects your unique taste.
From vibrant patterns to subtle textures, the possibilities are endless when you take control of your home’s lighting design.
This step-by-step guide will walk you through everything you need to know about making your DIY lampshade, from selecting the right materials to adding those perfect finishing touches.
Let’s get started on this fun and practical project that will brighten both your room and your crafting confidence!
Materials You’ll Need
|
Kit-Based Method |
From-Scratch Method |
|
Core Materials |
Core Materials |
|
• Lampshade kit (rings + adhesive panel) |
• 10-15 wire coat hangers |
|
• Fabric of your choice |
• Outer fabric for the cover |
|
• Sharp scissors |
• White lining fabric |
|
• Iron |
• Cotton tape |
|
Optional Additions |
Essential Tools |
|
• Double-sided tape |
• Wire cutters |
|
• Craft knife |
• Pliers |
|
• Paint sample pots (as weights) |
• Sewing machine or needle & thread |
|
• Decorative trims |
• Measuring tape |
|
• Fabric glue |
• Scissors |
|
Workspace Setup |
• Pencil |
|
• Large flat surface |
• Chalk |
|
• Good lighting |
• Pins |
|
• Relaxing music (seriously!) |
Optional Enhancements |
|
• Your favorite beverage |
• Decorative trims |
|
• Fabric glue |
|
|
• Old lampshade (for template) |
Pro Tips for Material Selection
Fabric Choice: Avoid materials that fray easily when cut – it makes tucking edges much more manageable. Cotton blends work wonderfully for beginners.
Kit Quality: Look for reputable brands like Dannells for reliable adhesive panels and sturdy rings. Cheaper kits often mean frustrating assembly later.
Wire Hangers: Choose hangers with consistent thickness. Avoid plastic-coated ones as they’re harder to bend and shape properly.
Workspace: You’ll need more room than you think! A kitchen island or dining table works perfectly for spreading out your materials.
Choosing Your Lampshade Style
Drum vs Paneled Shape
|
Drum Shade |
Paneled Shade |
|
Appearance |
Appearance |
|
• Smooth, cylindrical shape |
• Structured sections with visible seams |
|
• Continuous fabric wrap |
• Individual fabric panels |
|
• Clean, modern look |
• Traditional, architectural feel |
|
• Fabric pattern flows seamlessly |
• Pattern creates interesting segments |
|
Construction |
Construction |
|
• Single piece of fabric |
• Multiple fabric pieces (usually 6-8) |
|
• Rolled around frame rings |
• Each panel is attached separately |
|
• Easier for beginners |
• Requires more precision |
|
• Fewer seams to manage |
• More seams but easier to adjust |
|
Best For |
Best For |
|
• Contemporary spaces |
• Classic or vintage decor |
|
• Bold patterns or solid colors |
• Detailed fabrics or mixed materials |
|
• Quick weekend projects |
• When you enjoy detailed handwork |
|
• First-time makers |
• Experienced crafters |
Pendant vs Table Lampshade Fittings
|
Pendant Fittings |
Table Lamp Fittings |
|
Mounting Style |
Mounting Style |
|
• Hangs from a ceiling fixture |
• Sits on lamp base |
|
• The top ring has hanging hardware |
• Bottom ring has lamp base attachment |
|
• Utility ring positioned at the top |
• Utility ring positioned at the bottom |
|
• Cord runs through the center |
• Fits over existing lamp post |
|
Size Considerations |
Size Considerations |
|
• Can be larger and more dramatic |
• Must proportion to base size |
|
• Height affects room lighting |
• Height affects table clearance |
|
• Diameter impacts hanging clearance |
• Width affects the surrounding space |
|
• Weight matters for ceiling support |
• Stability depends on base weight |
|
Installation |
Installation |
|
• Requires ceiling electrical work |
• Simply replaces the existing shade |
|
• Professional installation recommended |
• DIY-friendly swap |
|
• Consider ceiling height |
• Instant transformation |
|
• Chain or cord length matters |
• No electrical work needed |
|
Style Impact |
Style Impact |
|
• Creates a focal point overhead |
• Adds accent lighting |
|
• Affects the entire room ambiance |
• Complements existing decor |
|
• Statement piece potential |
• Functional and decorative |
|
• Modern, industrial feel |
• Cozy, intimate lighting |
Step-by-Step: How to Make a DIY Lampshade
Step 1: Prepare the Fabric
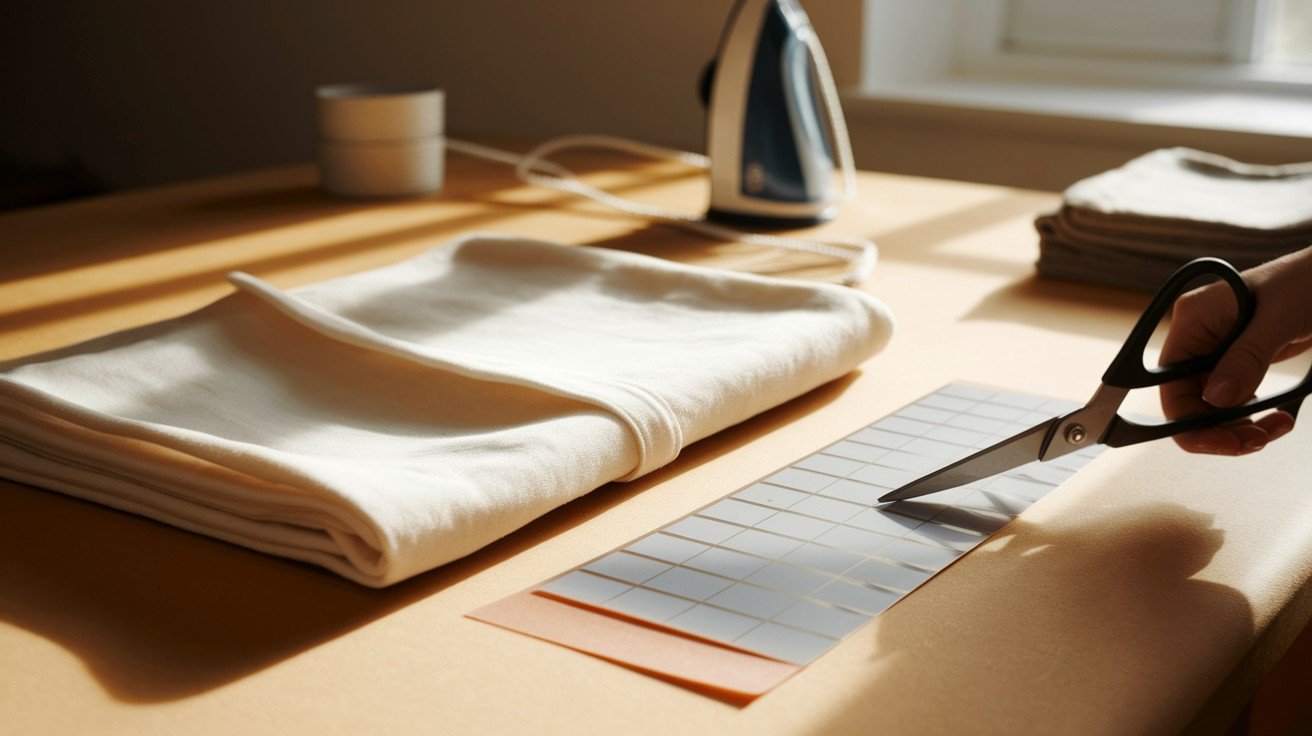
Choose fabric that doesn’t fray easily; cotton blends work great for beginners. Iron thoroughly to remove all wrinkles, as creases become permanent once attached.
For kits, lay the adhesive panel over the fabric and cut with 2cm extra around all edges. For scratch builds, create a paper pattern first, then trace and cut fabric pieces accordingly.
Step 2: Attach the Fabric
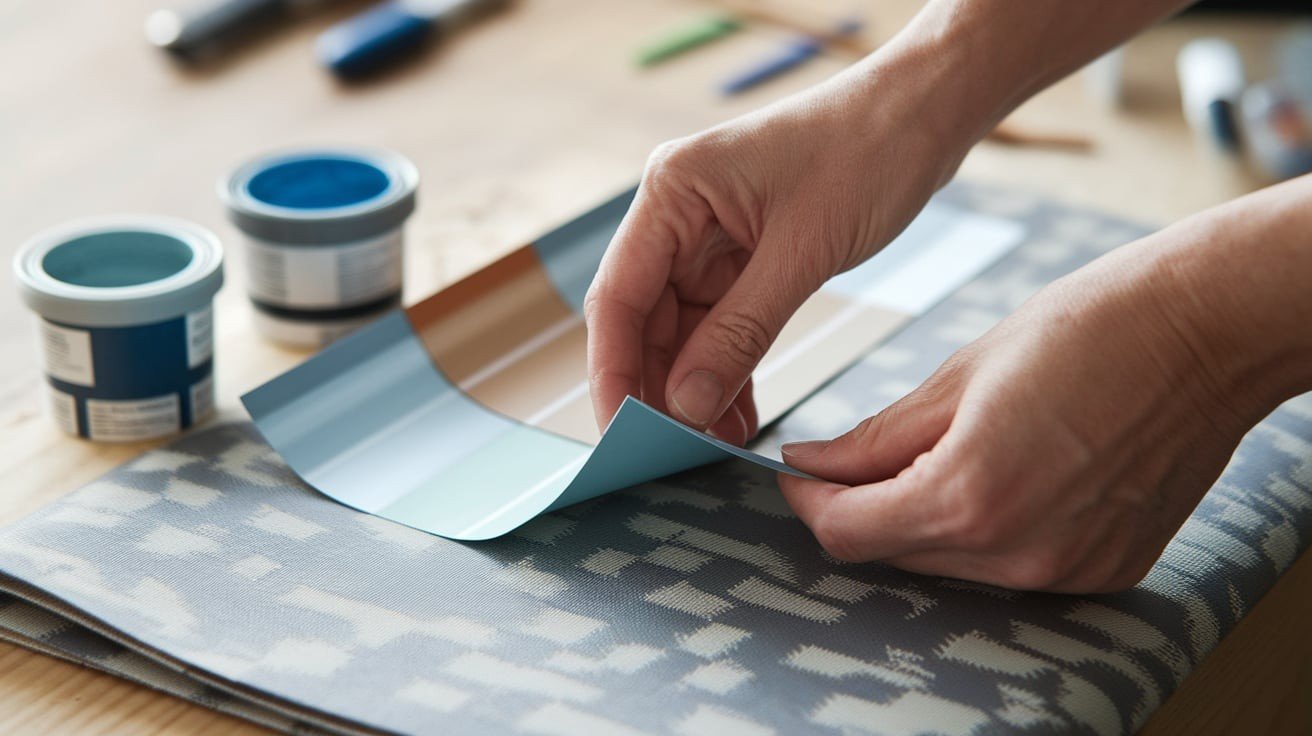
Place the fabric face down on the work surface. For kits, peel back 10cm of the adhesive panel backing and position carefully on the fabric.
Slowly remove the remaining backing while pressing firmly to avoid air bubbles. Use weights like paint pots to prevent rolling. For scratch builds, apply fabric glue to edges and smooth evenly across each panel section.
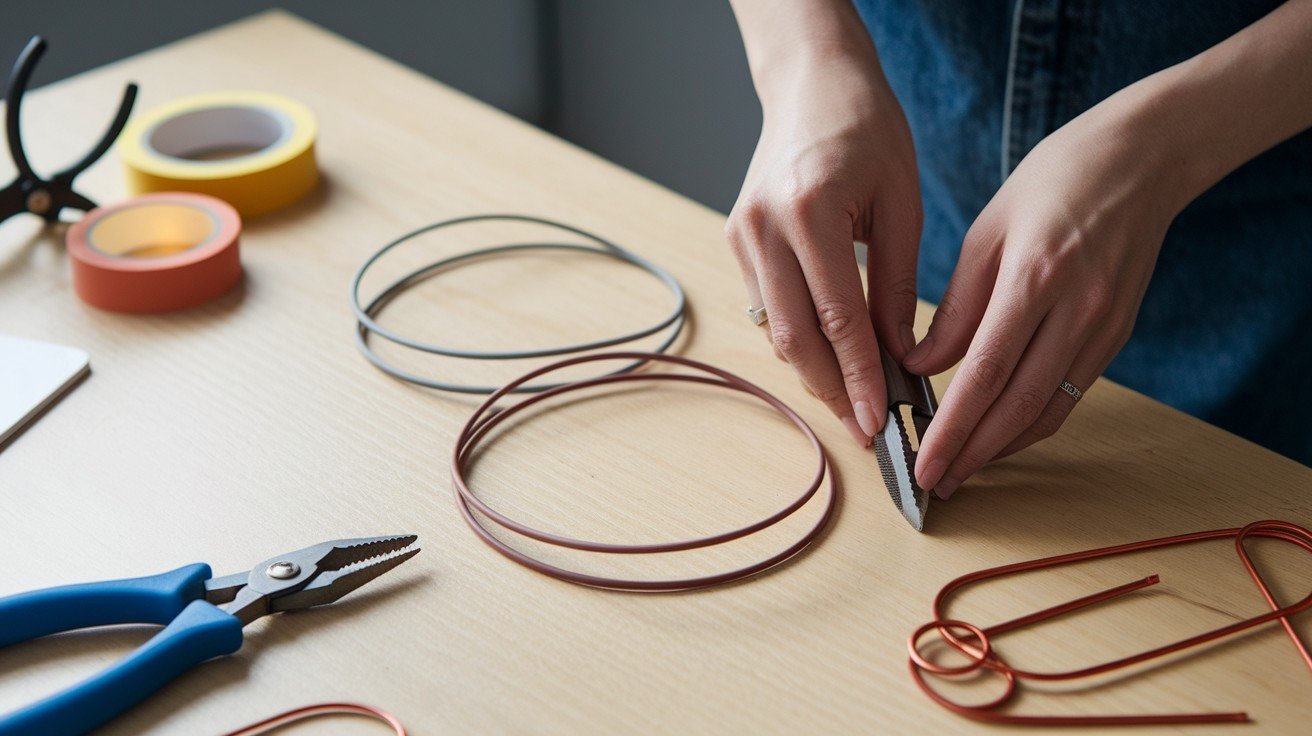
Step 3: Prepare the Frame
Kit method: Apply double-sided tape around the outer edges of both provided rings, then remove red backing paper to expose sticky surfaces.
From scratch: Straighten wire hangers completely, bend into two circles (different sizes for tapered shade), twist ends securely with pliers, then attach 6 vertical support wires between rings.
Step 4: Assemble the Shade
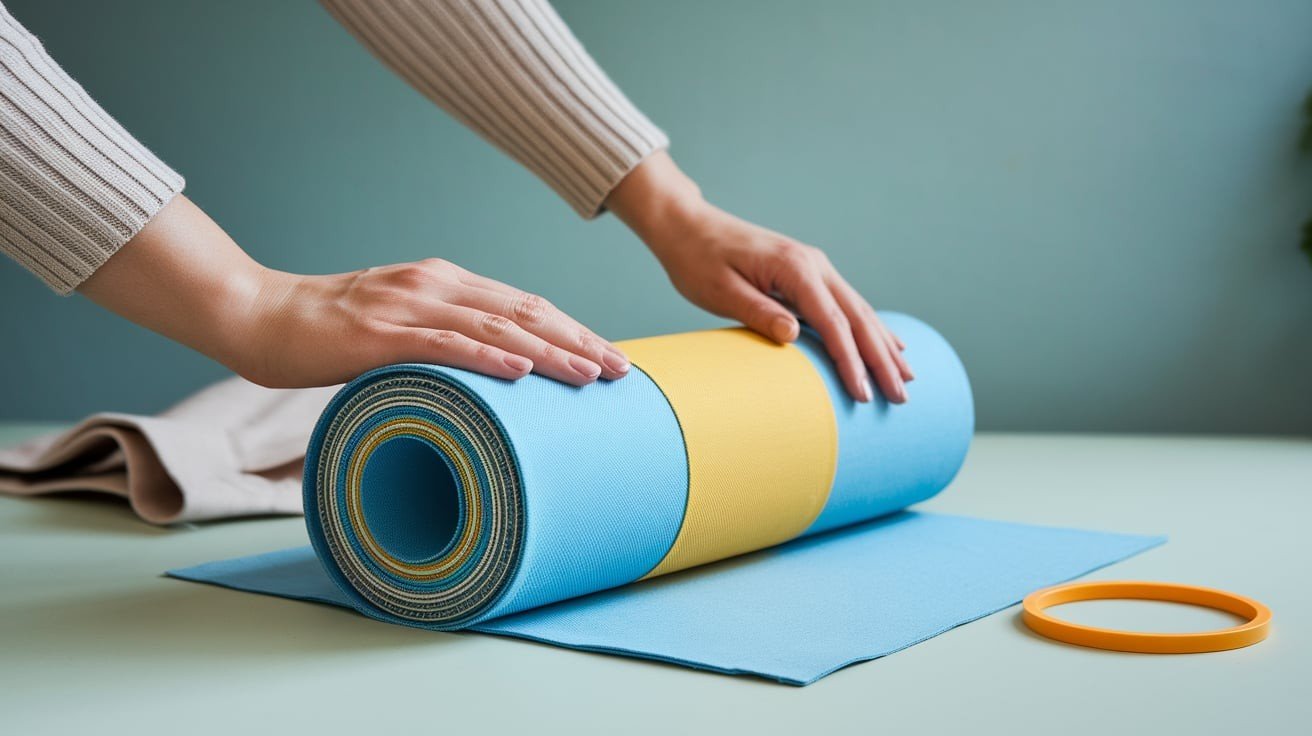
Position rings at fabric panel edges, utility ring (with lamp fittings) goes at the bottom for table lamps, and top for pendants. Roll both rings together in unison, keeping aligned with the panel edges. The sticky tape will grab fabric as you roll.
When fully wrapped, overlap edges slightly and press seam firmly to seal completely.
Step 5: Finish the Edges
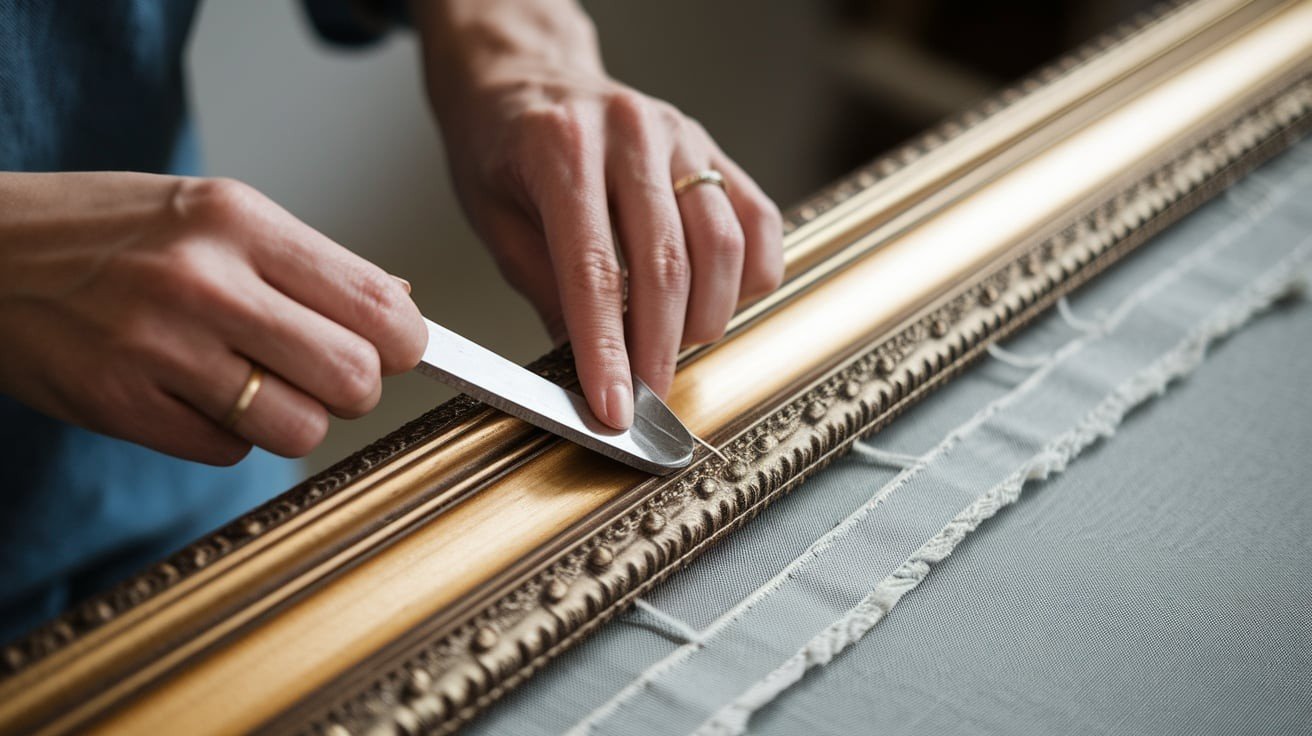
This is the trickiest part, requiring patience. Use the triangular finishing tool (or a similar pointed tool) to push fabric behind the rings.
Work around the entire circumference, tucking frayed edges underneath sticky rings. Use both tool ends, the jagged side to pry the ring away, the pointed end to shove fabric underneath for clean, professional-looking edges.
Step 6: Add Final Touches (Optional)
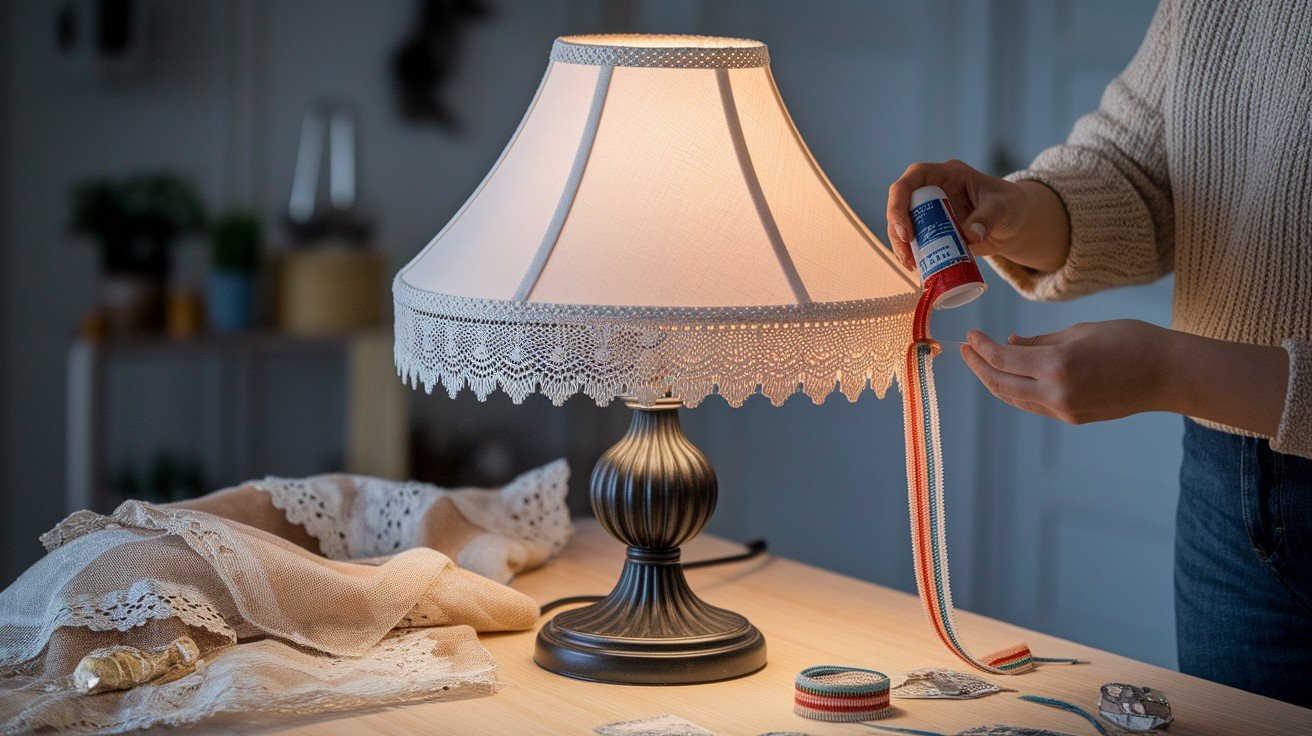
Hide any visible stitches or imperfections with decorative trims glued around the top and bottom edges. Ensure trims don’t extend beyond the frame rim.
Try ribbon, lace, or contrasting fabric strips for personality. For creative flair, experiment with mixed materials like burlap, vintage maps, or even carefully applied moss for unique textures and visual interest.
Tips & Troubleshooting
- Don’t recruit a helper for the rolling stage – Despite the kit instructions suggesting assistance, the sticky tape will attach to extra hands and create chaos. Work solo with good lighting and take your time for better control and fewer frustrations.
- Use sharp scissors and avoid stretchy fabrics – Blunt tools create ragged cuts that fray badly during assembly. Fabrics that stretch or fray easily (like loose weaves) make edge finishing nearly impossible and leave messy results.
- Keep weights handy throughout the process – Use paint pots or similar objects to prevent adhesive panels from rolling back up. Without weights, you’ll spend more time fighting curling materials than actually crafting your shade.
- Position the utility ring correctly before rolling – For table lamps, the utility ring goes at the bottom with angles facing up; for pendants, it goes at the top. Getting this wrong means starting over completely since rings can’t be repositioned once attached.
- Take breaks during edge finishing – This final step causes the most frustration and nearly leads to project abandonment. Step away when annoyed, return with patience, and use both ends of the finishing tool for best results.
Conclusion
There you have it, your complete guide to creating a custom DIY lampshade that perfectly matches your style and budget!
From gathering materials to adding those final decorative touches, you now have all the knowledge needed to transform any space with personalized lighting.
Remember, this project is supposed to be enjoyable, so don’t stress if everything isn’t perfect.
Those little imperfections add character and prove it’s handmade with love.
Start with a simple drum shade using a kit if you’re new to crafting, then work your way up to more complex designs as your confidence grows.
The best part? You’ve just saved yourself hundreds compared to designer options while creating something unique.
So grab your favorite fabric, put on some music, pour that glass of wine, and get ready to brighten up your home with your very own custom creation!
Frequently Asked Questions
How long does it take to make a DIY lampshade?
Kit-based shades take 1-2 hours, while from-scratch projects need 3-4 hours, depending on complexity and your crafting experience level.
What’s the best fabric choice for beginners?
Cotton blends work perfectly – they don’t fray easily, iron smoothly, and come in countless patterns while being budget-friendly and forgiving.
Can I use recycled materials instead of new fabric?
Absolutely! Old curtains, vintage tablecloths, maps, or even burlap sacks create unique shades with character and environmental benefit, too.
Why does my lampshade look wonky after assembly?
Usually caused by uneven rolling or incorrect ring positioning. Keep rings aligned with panel edges and ensure utility ring orientation matches usage.
How do I fix frayed edges that won’t stay tucked?
Use fabric glue sparingly on stubborn frays, work with sharper tools, or trim problem areas carefully before attempting to tuck again.