

Your walls are staring back at you with that same old color, and you’re ready for a change. But hiring professional painters?
That’s not in the budget right now. Good news, you don’t need to break the bank or call in the experts to give your space a fresh new look.
DIY wall painting ideas can completely change how a room feels, and the best part is that you’re in complete control of the creative process.
From adding subtle texture that mimics expensive wallpaper to creating bold patterns that make guests do a double-take, these techniques are easier than you might think.
Ready to roll up your sleeves and create something amazing?
Let’s look at some game-changing methods that will have your friends asking who your decorator is.
Benefits of Trying DIY Wall Painting Techniques
- Save money while achieving professional-looking results – Skip expensive contractor fees and high-end wallpaper costs by creating custom finishes with basic paint and simple tools that cost a fraction of hiring professionals.
- Express your style through color combinations and textures – Mix and match hues, create patterns, and add dimensional effects that reflect your personality rather than settling for standard paint jobs.
- Gain complete creative control over your space – Make design decisions on your timeline, change directions mid-project if inspiration strikes, and achieve exactly the look you envision without compromising.
- Build confidence and practical skills – Learn valuable home improvement techniques that you can apply to future projects, making you more self-sufficient and capable of tackling other decorating challenges.
- Create one-of-a-kind spaces that guests will remember – Develop signature looks that can’t be replicated by standard painting services, giving your home a distinctive character that stands out from typical interiors.
Choosing the Right Technique for Your Space
Before you grab that paintbrush, take a step back and assess your room’s unique characteristics.
Wall size plays a major role; large walls can handle bold patterns and dramatic techniques, while smaller spaces benefit from subtle textures that won’t overwhelm the area.
Lighting conditions are equally important; natural light shows off metallic finishes beautifully, but darker rooms might need lighter base colors to prevent techniques from looking muddy.
Your existing decor should guide your choices, too. If you have busy furniture or lots of artwork, opt for simpler painting methods that complement rather than compete.
Consider your current color palette; are you working with warm earth tones, cool blues and grays, or vibrant jewel colors? The technique you choose should enhance what’s already working in your space.
Best Rooms for Creative Wall Paint
Accent walls are perfect starting points for experimenting with these techniques.
In bedrooms, try textured methods behind the headboard to create a focal point without overwhelming your relaxation space.
Entryways make excellent candidates for bold patterns since they’re smaller areas where you can make a strong first impression.
Dining areas work well with sophisticated techniques like dragging or metallic layering, while home offices can benefit from vertical stripes that make the space feel taller and more energizing. Start with one feature wall before committing to an entire room.
Tools & Materials Checklist
Basic Supplies You’ll Need for Any Technique
|
Item |
Purpose |
Quality Tips |
|
Quality Paint |
Base and accent colors |
Choose paint with good coverage and durability |
|
Painter’s Tape |
Clean lines and protection |
Use high-quality tape to prevent bleeding |
|
Drop Cloths |
Floor and furniture protection |
Canvas cloths work better than plastic |
|
Brushes |
Detailed work and texture application |
Invest in good synthetic brushes |
|
Rollers |
Base coat application |
Choose an appropriate nap for your wall texture |
Special Tools for Each Method
|
Technique |
Required Tools |
Optional Extras |
|
Strie (Dragging) |
Dragging combs, glaze medium |
Fine-bristle brush, mixing bucket |
|
Harlequin Pattern |
Stencil sheets, measuring tape |
Level, pencil for marking |
|
Metallic Sheen Layering |
Metallic paint, specialty rollers |
Blending brushes, sea sponges |
|
Vertical Gradient Stripe |
Multiple paint shades, wide brushes |
Blending medium, spray bottle |
|
Dry Brush Crosshatch |
Dry brushes, minimal paint |
Rags for wiping, small containers |
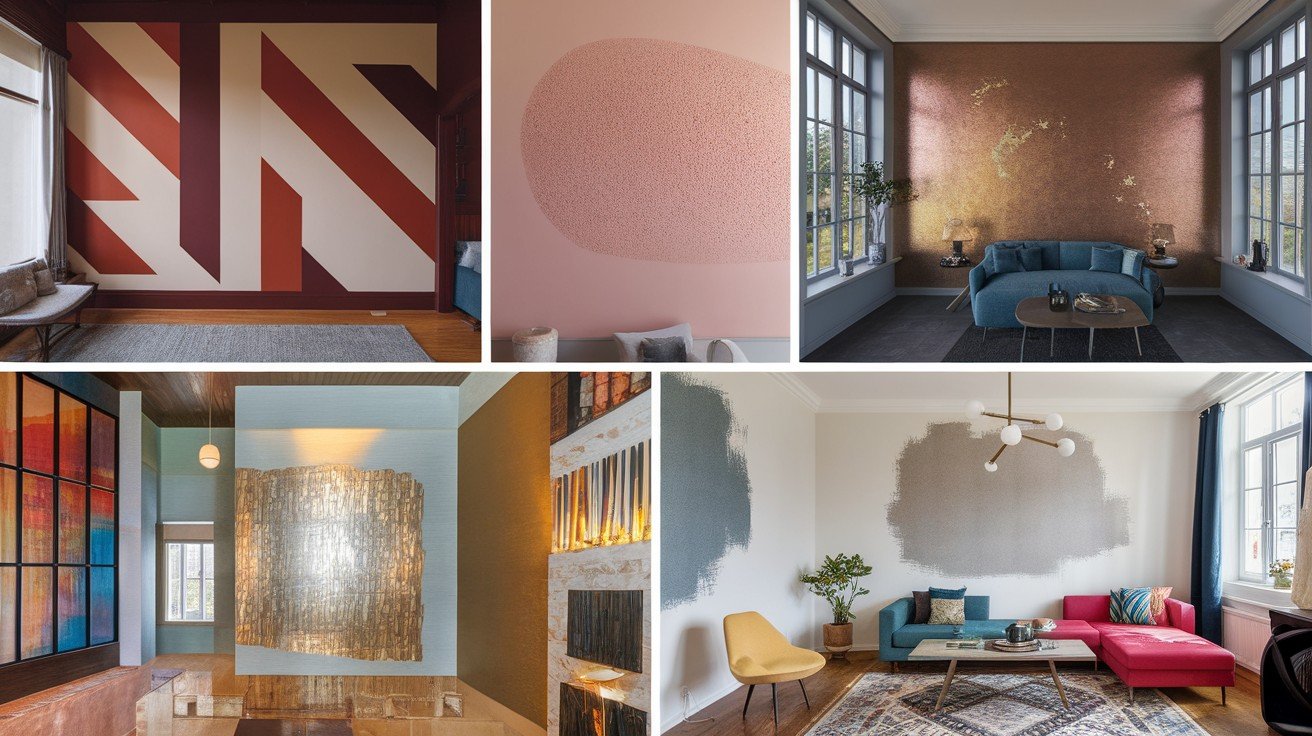
5 Unique DIY Wall Painting Techniques to Try
1. Strie (Dragging Technique)
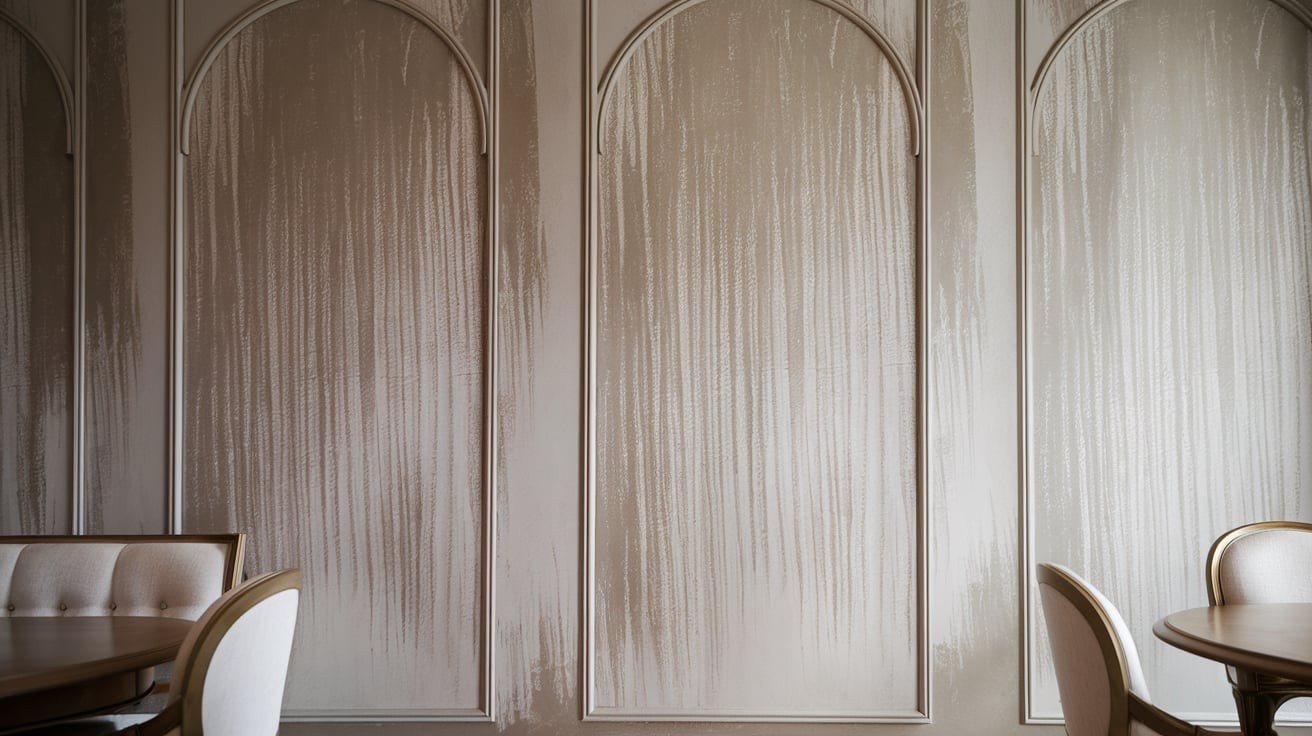
This French technique creates a refined linen or brushed fabric appearance on your walls. Mix the glaze with your base paint, then drag a dry brush vertically through the wet mixture to create fine, parallel lines.
The result mimics expensive textured wallpaper and works beautifully in dining rooms, living areas, or bedrooms where you want sophisticated texture without overwhelming patterns.
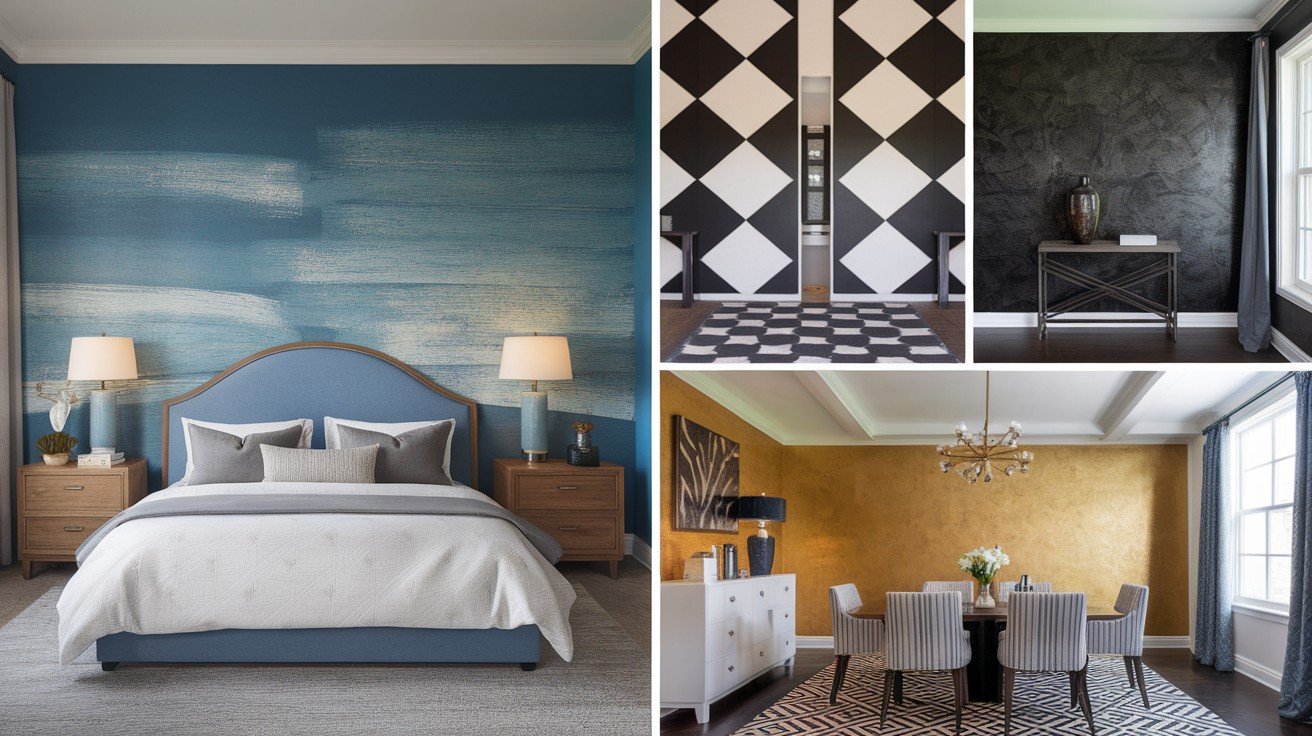
2. Harlequin Pattern
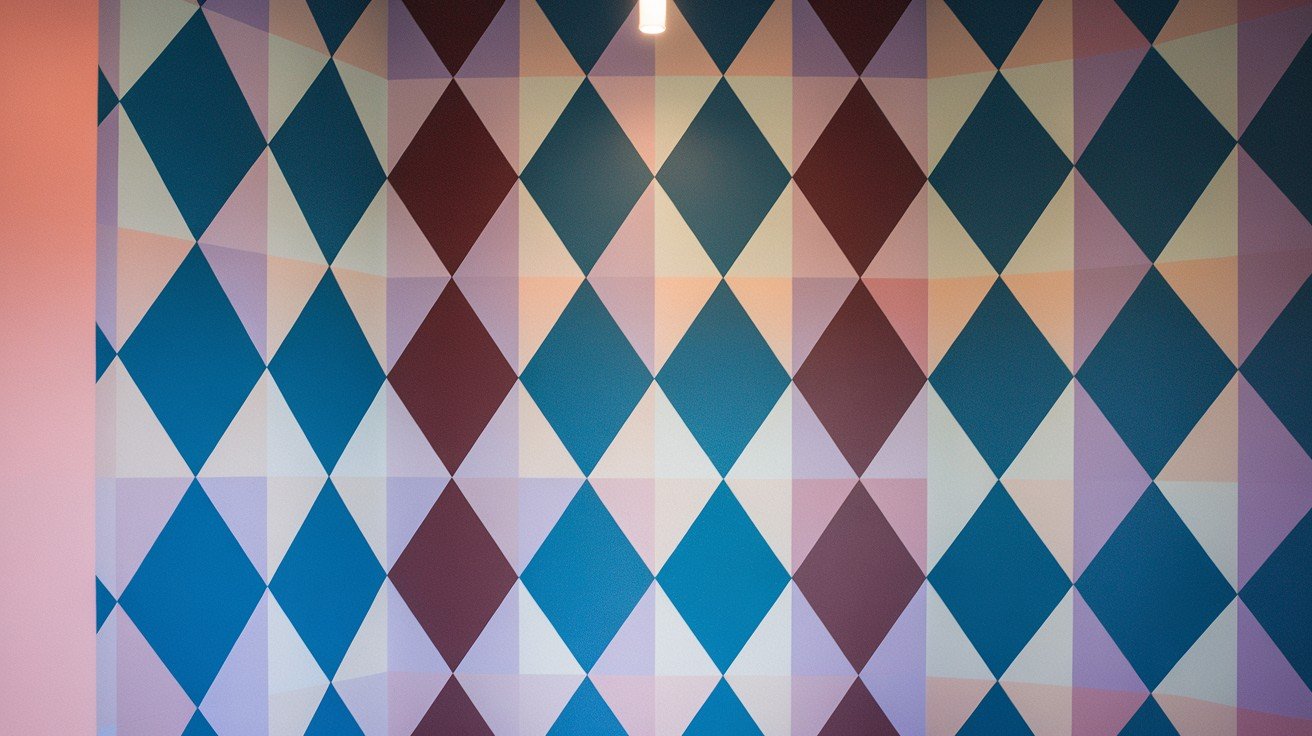
Create visual interest with this classic diamond checkerboard design that adds geometric sophistication to any space.
Use painter’s tape to mark diamond shapes, then alternate colors in a checkerboard pattern. Soft pastels work well in bedrooms or nurseries, while bold, contrasting colors make dramatic statements in powder rooms or accent walls.
This technique requires patience but delivers impressive results.
3. Metallic Sheen Layering
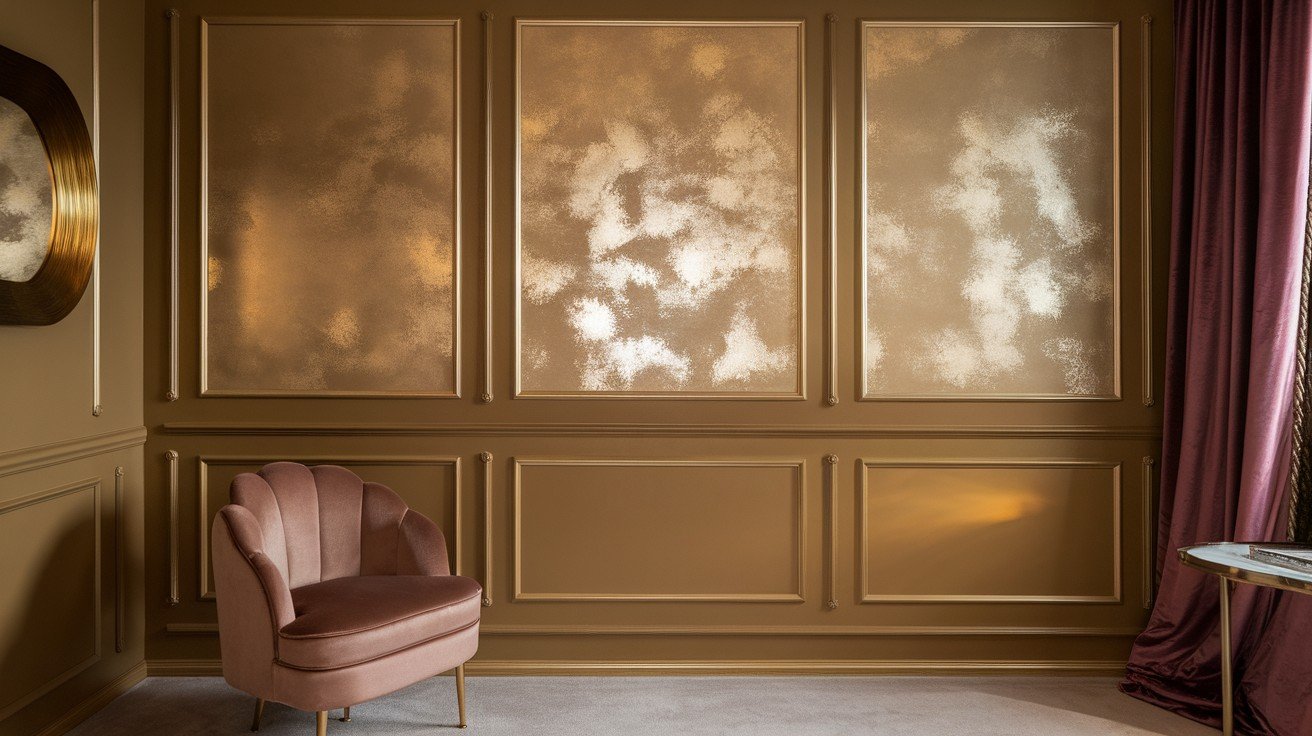
Add glamour and depth by layering metallic paint over a darker matte base coat. Apply your base color first, let it dry completely, then use a roller or brush to add metallic accents in sweeping motions.
This creates a subtle shimmer that catches light beautifully. Perfect for powder rooms, master bedrooms, or any space where you want to add luxury and drama.
4. Vertical Gradient Stripe Wall
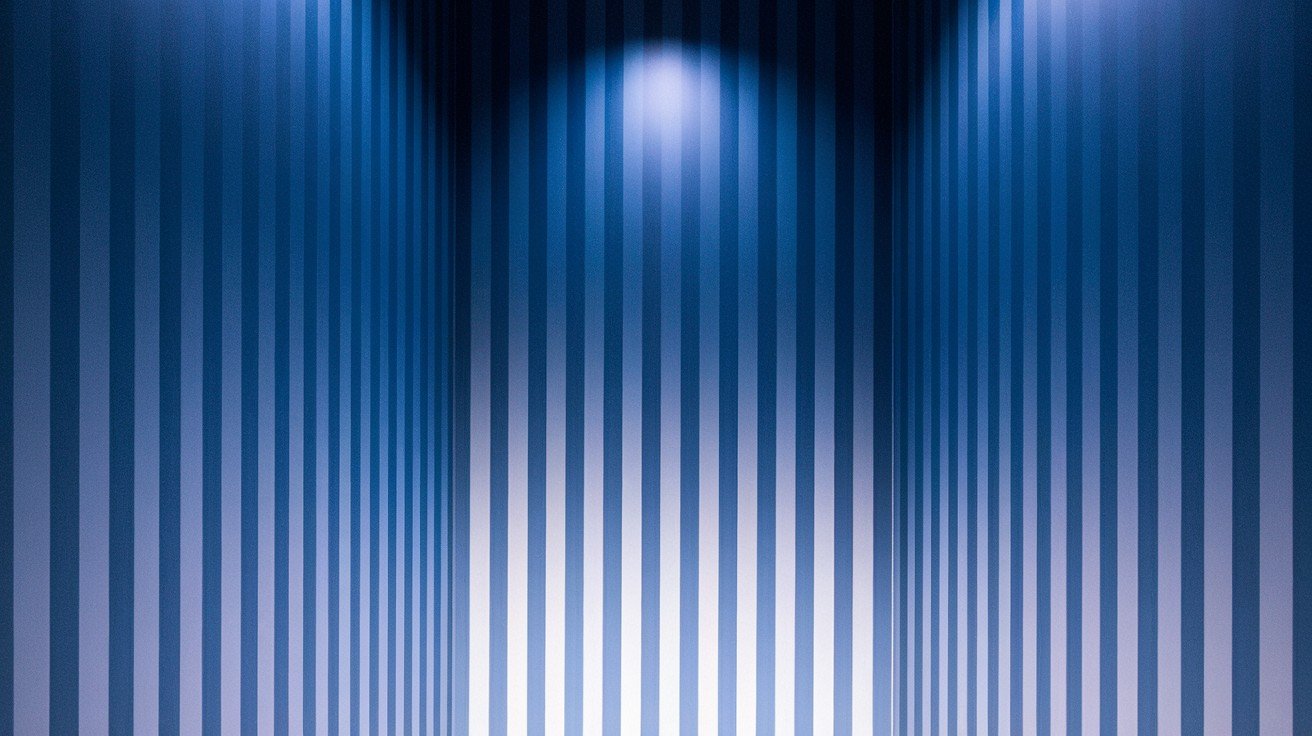
Combine the visual impact of stripes with the softness of ombre effects. Paint vertical stripes in gradually lightening or darkening shades of the same color family.
This technique makes ceilings appear higher and rooms feel more spacious. It’s particularly effective in narrow hallways, small apartments, or any room where you want to create the illusion of added height and openness.
5. Dry Brush Crosshatch Technique
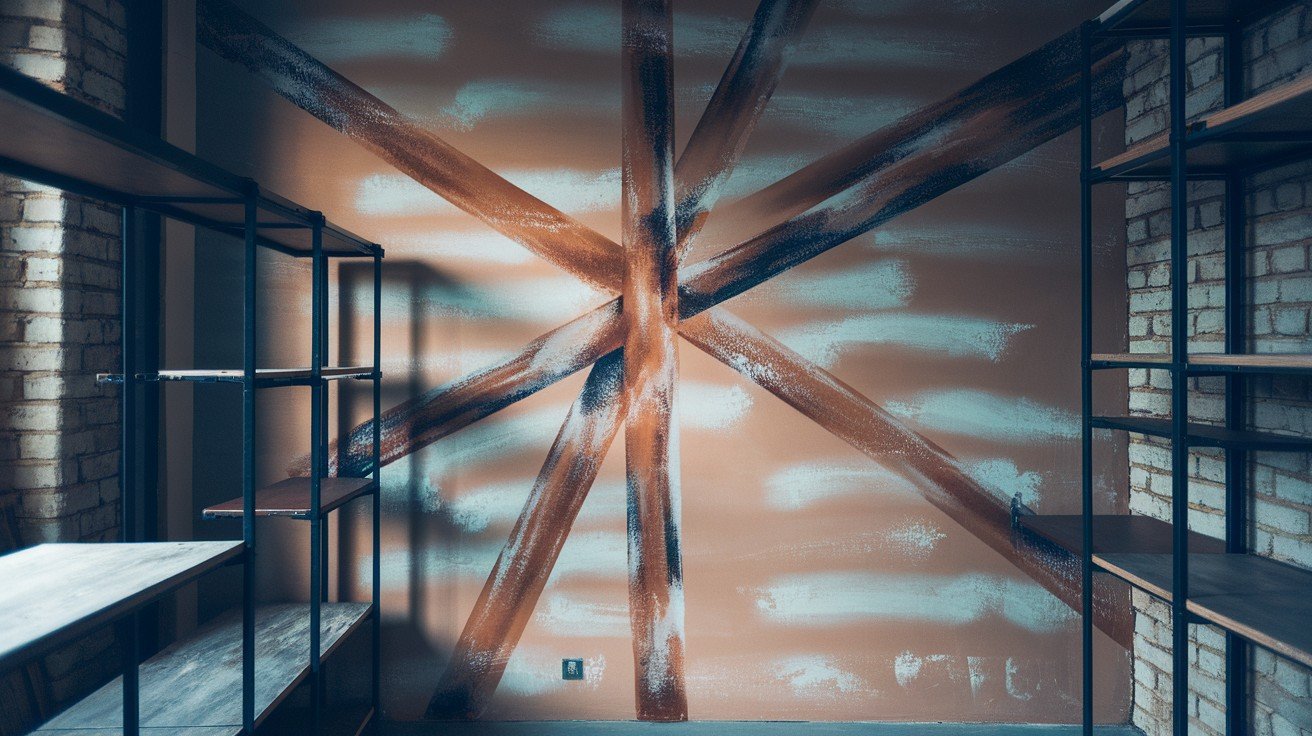
Achieve a rustic, industrial aesthetic with minimal supplies and effort. Load a dry brush with small amounts of paint, then apply in crossing diagonal strokes to create texture.
This method works best over a base coat and creates organic, weathered-looking patterns. Ideal for lofts, studios, or modern homes where you want to add character without formal patterns or bright colors.
Conclusion
These DIY wall painting techniques prove that you don’t need years of experience or expensive equipment to create stunning, professional-looking results.
From the refined texture of strie to the bold geometry of harlequin patterns, each method offers a unique way to add personality and visual interest to your home.
The key to success lies in proper preparation, choosing the right technique for your space, and taking your time with each step.
Start small with an accent wall to build your confidence before tackling larger projects. Remember that mistakes are part of the learning process; most can be painted over and tried again.
Your walls are waiting to be upgraded into something special.
With these techniques in your toolkit, you’re ready to create spaces that reflect your style while staying within budget. Happy painting!
Frequently Asked Questions
How long does each DIY wall painting technique take to complete?
Most techniques require 4-6 hours, including prep time, with drying periods adding a day for full completion.
Can I use regular paint instead of specialty paints for these techniques?
Yes, but adding glaze or mixing mediums to regular paint will improve workability and extend drying time.
What’s the best way to fix mistakes while applying these painting techniques?
Work in small sections, keep wet rags handy, and remember that most errors can be painted over once dry.
Do I need to prime my walls before trying these decorative painting methods?
Priming is recommended, especially over dark colors or glossy surfaces, to ensure even coverage and better adhesion.
Which technique works best for beginners who’ve never done decorative wall painting?
Start with dry brush crosshatch or simple vertical stripes as they’re forgiving and require minimal special tools.