

A common question homeowners face when planning a kitchen makeover is simple yet crucial: Do you have to sand cabinets before painting?
The short answer isn’t as straightforward as you might hope.
Painting cabinets can upgrade your kitchen without the expense of full replacement, but the prep work makes all the difference between a professional-looking finish and a disappointing DIY disaster.
Some situations require sanding, while others offer shortcuts that still deliver quality results.
Proper preparation determines how long your newly painted cabinets will look fresh and hold up to daily use.
Understanding when you can skip the sandpaper and when it’s non-negotiable will save you time, money, and frustration.
Let’s examine the factors that influence this decision and help you choose the right approach for your specific cabinet situation.
Why Sanding Matters Before Painting?
Sanding serves three critical functions that directly impact your cabinet painting success.
First, it creates a slightly rough surface that helps paint grip properly; think of it like giving your paint something to hold onto rather than trying to stick to a slippery surface.
Second, sanding removes that shiny, glossy finish that repels paint. Most factory-finished cabinets have protective coatings designed to resist stains and moisture, which unfortunately also resist paint.
By abrading this surface, you’re breaking through that barrier.
Third, sanding smooths out minor scratches, dents, and imperfections that would otherwise show through your new paint job.
Even small flaws become magnified under a fresh coat of paint, especially in good lighting.
Skip this step at your own risk. Paint applied to unprepared surfaces often starts peeling within months, creates an uneven, patchy appearance, or wears off quickly in high-touch areas like cabinet doors and drawer fronts.
The time spent sanding upfront prevents these costly mistakes and ensures your hard work lasts for years.
When Do You Need to Sand Cabinets?
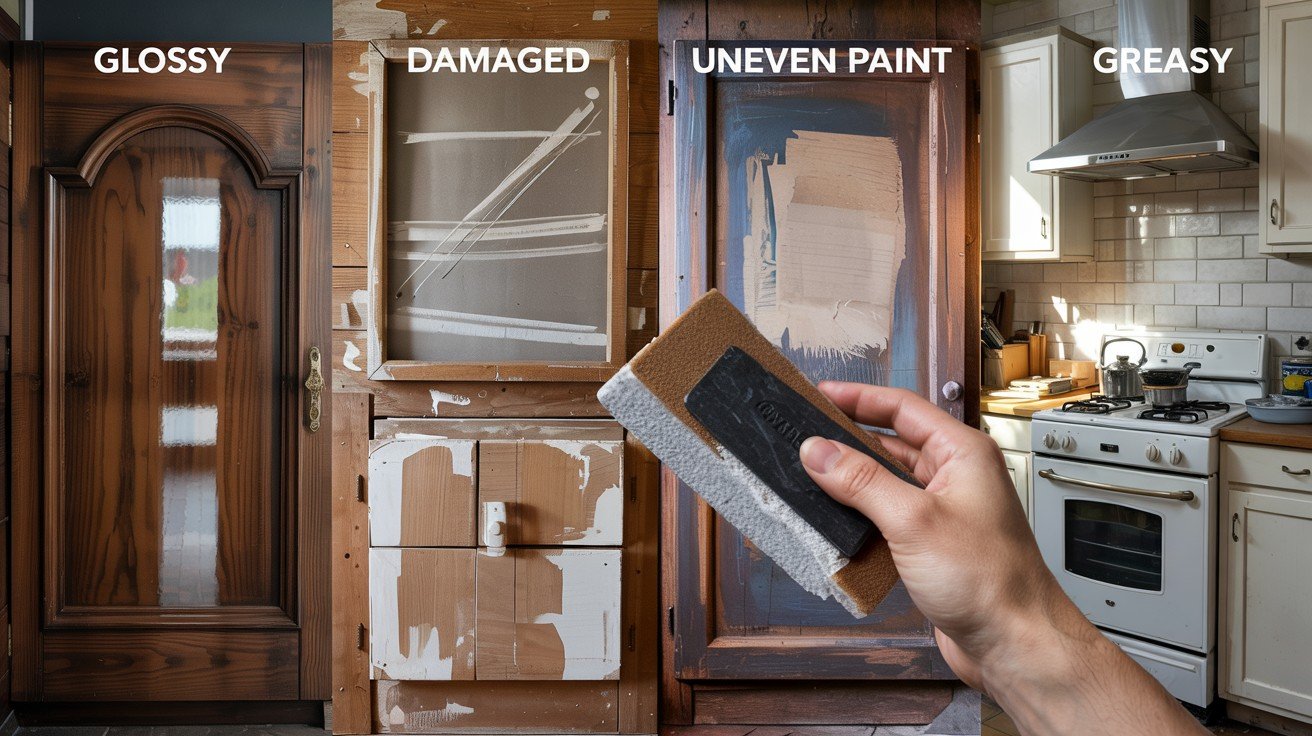
- Glossy or Lacquered Finishes: Shiny surfaces act like a shield against paint. Factory lacquer, polyurethane, or high-gloss finishes create such a smooth surface that paint simply cannot bond properly. Without sanding, your fresh paint will slide right off or peel away in sheets within weeks.
- Visible Damage or Chipping Paint Scratches, gouges, or areas where old paint is already flaking need attention before applying new coats. Paint won’t hide these problems – it makes them more noticeable. Sanding levels these imperfections and removes loose paint that would continue flaking under your new finish.
- Previously Painted Cabinets: Multiple layers of old paint create an uneven surface with varying adhesion qualities. Some areas may be glossy while others are flat, leading to inconsistent results. Sanding creates a uniform surface for optimal paint performance.
- Heavy Grime or Grease Build-up Kitchen cabinets accumulate cooking oils and residue that cleaning alone can’t fully remove. This invisible barrier prevents proper paint adhesion, causing the new finish to bubble, peel, or wear off quickly in frequently touched areas.
Without proper sanding in these situations, expect paint failure within 6-12 months, forcing you to start over completely.
When You May Not Need to Sand?
If using a Bonding Primer, High-quality bonding primers are specifically formulated to stick to glossy surfaces without sanding. These specialized products create a bridge between your existing finish and new paint, eliminating the need for aggressive surface preparation. However, thorough cleaning is still essential for the best results.
Chalk or Mineral Paint Use These paint types contain natural adhesion properties that allow them to grip most surfaces without extensive prep work. Chalk paint, in particular, was designed for furniture refinishing with minimal preparation. Just clean the surface well and apply directly in most cases.
New, Unfinished Wood Cabinets Raw wood naturally accepts paint without sanding since there’s no existing finish to remove. A light cleaning to remove dust and oils from handling is typically sufficient before priming and painting.
Lightly Worn Cabinets in Good Condition: Cabinets with minimal wear, no damage, and a slightly dulled finish from age may only need light preparation. The existing wear has already broken down some of the glossy surface.
Light Alternatives to Full Sanding Scuff sanding with fine-grit paper (220-320 grit) provides just enough surface texture without the labor of complete sanding. This quick pass removes gloss while preserving the underlying finish integrity.
Step-by-Step: If You Decide to Sand
Tools and Materials Needed
|
Item |
Purpose |
|
120-grit sandpaper |
Initial heavy sanding |
|
220-grit sandpaper |
Final smoothing |
|
Sanding block or electric sander |
Even pressure application |
|
Dust mask/respirator |
Breathing protection |
|
Safety glasses |
Eye protection |
|
Drop cloths |
Floor protection |
|
Tack cloth |
Dust removal |
|
Vacuum |
Cleanup between grits |
Proper Technique
Start with 120-grit paper to remove the existing finish and major imperfections. Sand in the direction of the wood grain using steady, even strokes with light to medium pressure.
Switch to 220-grit paper for your final pass to smooth the surface. Always sand with the grain, never against it, to avoid visible scratches in your finished product.
Apply consistent pressure – let the sandpaper do the work rather than forcing it. Too much pressure creates gouges while too little won’t remove the finish effectively.
Safety Tips
Always wear a dust mask or respirator to avoid inhaling fine particles. Ensure adequate ventilation by opening windows and using fans to circulate air.
Protect your eyes with safety glasses, especially when using power sanders. Clean up dust frequently to prevent buildup and maintain visibility of your work surface.
Price & Value
Emerald commands a premium price point, typically costing 20-30% more than Duration, but delivers superior performance that justifies the investment for high-end projects.
Its advanced formula and exceptional durability make it ideal for homeowners seeking long-term value.
Duration offers excellent performance at a more accessible price point, making it a smart choice for budget-conscious projects without sacrificing quality.
Both paints provide solid return on investment, but Duration gives you professional results at a fraction of Emerald’s cost while still maintaining Sherwin-Williams’ reputation for reliability.
Performance & Durability
Stain Resistance
Emerald’s advanced formula creates a surface that resists common household stains and wipes clean with minimal effort, making it ideal for kitchens and children’s rooms.
Duration offers solid stain protection but requires more scrubbing to remove stubborn marks, though it still outperforms many competitor paints.
Longevity
Emerald maintains its fresh appearance longer in high-traffic areas like hallways and living spaces, thanks to its superior scuff resistance and color retention.
Duration excels in exterior applications where weather resistance matters most, providing years of reliable protection against fading and chalking.
Moisture & Mold Resistance
Emerald handles typical indoor humidity well and resists moisture-related issues in most home environments.
Duration takes the lead in challenging conditions, offering enhanced mildew resistance that makes it the preferred choice for bathrooms, basements, and exterior surfaces where moisture exposure is constant.
Conclusion
The decision to sand cabinets before painting depends on your specific situation, but when in doubt, sanding is usually the safer choice.
Glossy finishes, damaged surfaces, and previously painted cabinets almost always require sanding for optimal results.
However, modern bonding primers and specialty paints like chalk paint can sometimes eliminate this step.
Consider your cabinet condition, chosen paint type, and desired longevity when making this decision.
A few hours of proper sanding often prevents months of frustration from peeling or chipping paint. Remember that surface preparation accounts for 80% of a successful paint job’s quality.
For best results, clean thoroughly regardless of your approach, test adhesion in an inconspicuous area, and don’t rush the prep work.
Quality preparation today means beautiful, durable cabinets that will look great for years to come.
Frequently Asked Questions
Can I use liquid deglosser instead of sanding?
Yes, liquid deglossers work well on glossy surfaces and save time, though sanding provides better adhesion.
What grit sandpaper should I use for cabinets?
Start with 120-grit for heavy work, finish with 220-grit for smoothness and optimal paint adhesion.
How do I know if my cabinets need sanding?
Test paint adhesion on a hidden area; if it peels easily, sanding is necessary.