

Your dresser doesn’t have to be boring. Right now, it’s probably just holding your clothes and collecting random stuff on top. That changes today.
I’ve spent years helping people transform their bedrooms. The dresser is often the most overlooked piece of furniture. Yet it sits right there in your line of sight every single day.
Here’s what you’ll find in this guide: 7 proven styling ideas that work, simple steps you can follow right away, real examples from professional designers, and tips that fit any budget.
You want your master bedroom to feel calm and put-together. I get it. You’re tired of that messy dresser top making your whole room look cluttered.
These aren’t fancy designer tricks that cost thousands. They’re practical ideas that real people use in real homes. Ready to make your dresser the best-looking piece in your bedroom? Let’s start.
Master Bedroom Dresser Decor Ideas
Here are 7 ideas that you’re sure to love. Let’s dive in:
1. Symmetrical Balance with Lamps
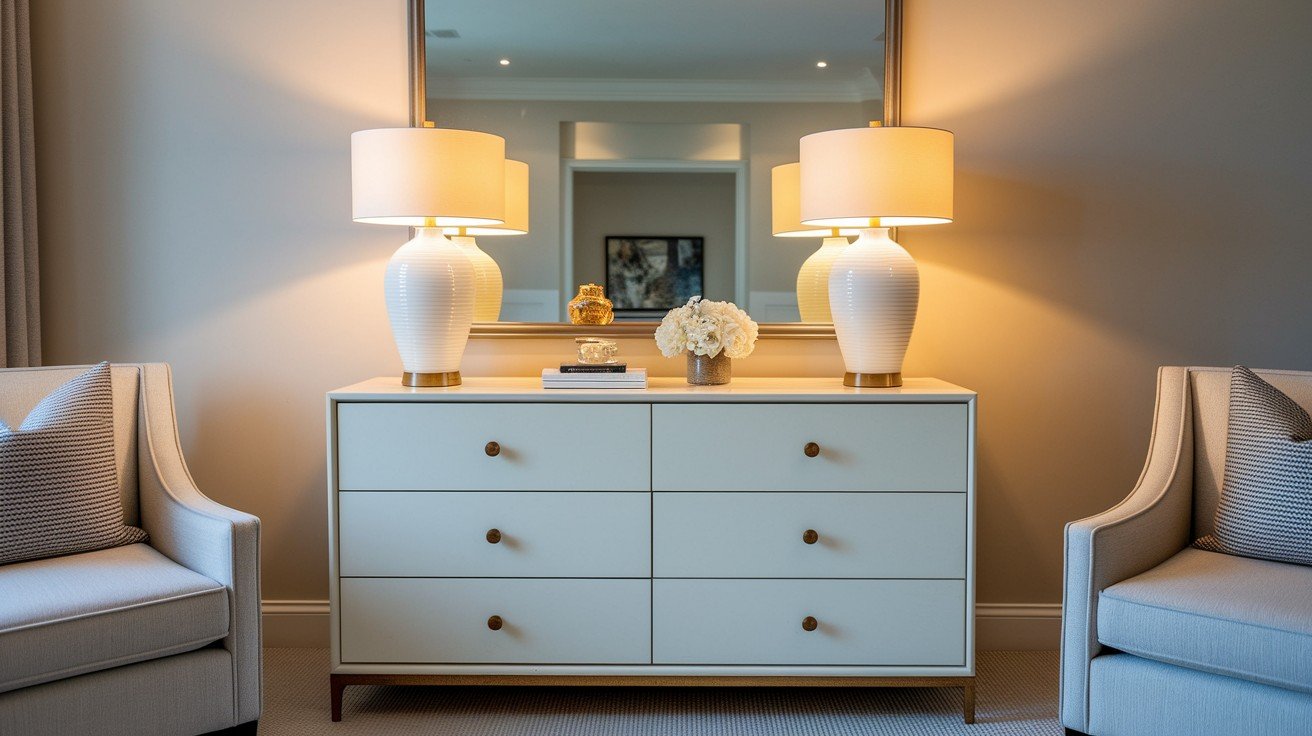
I love using matching lamps because they instantly make any dresser look polished. I place identical table lamps on both sides of my dresser, measuring the distance from each lamp to the edge so both sides match exactly.
Why does this work so well? Your brain loves balance. When you see matching items, you feel calm, and the setup looks intentional and professional. The lamps don’t have to be expensive – I’ve found great pairs at thrift stores for under $20.
The sizing rule is simple. Your lamps should be about 1/3 the width of your dresser. Small dresser gets small lamps, medium dresser gets medium lamps, and so on. I learned this the hard way when my tiny lamps looked ridiculous on a huge dresser.
Here’s my pro move: Turn both lamps on at the same time. The warm glow creates an instant ambiance and makes your bedroom feel like a hotel suite. This trick works with any style – modern lamps, vintage finds, or colorful ceramics. Symmetry makes everything look intentional and transforms your dresser from basic furniture into a focal point.
2. Statement Mirror Centerpiece
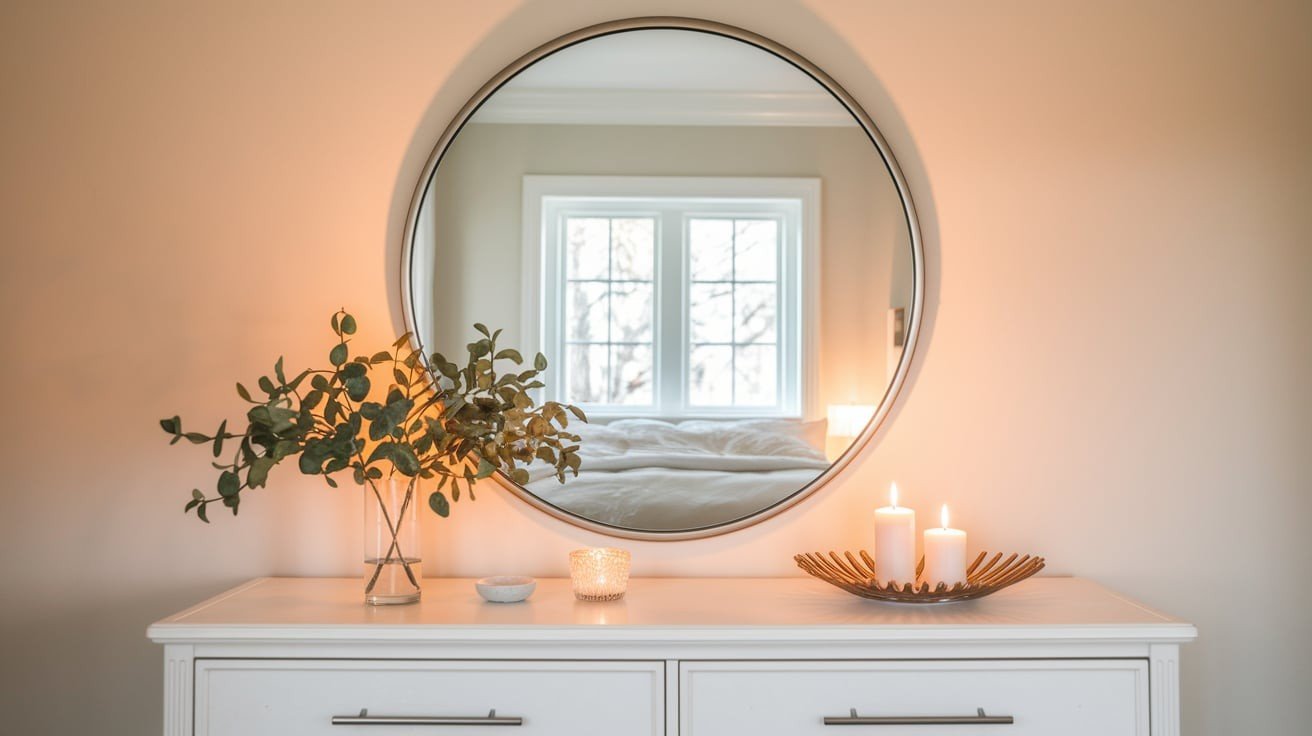
I hang a large mirror above my dresser because it’s the easiest way to make a big impact. The mirror becomes the star while everything else supports it, and your room instantly feels twice as big.
Here’s what I look for: Bold frames that stand out, a size that’s about 2/3 the width of my dresser, and a height that leaves 6-8 inches between the dresser and mirror.
The magic happens in three ways. You get more light bouncing around, the space feels larger, and you have a functional piece for getting ready each morning. I made one mistake early on – I chose a tiny mirror for a big dresser, and it looked lost and awkward.
My favorite trick? I position the mirror so it reflects something pretty, like a window view or nice art across the room. This doubles the visual interest. The frame matters too – thick dark frames create drama, thin metal feels modern, and wood adds warmth. Pick what matches your style, but make sure it has a presence.
Your dresser goes from boring to bold with just one well-placed mirror.
3. Layered Art and Frames
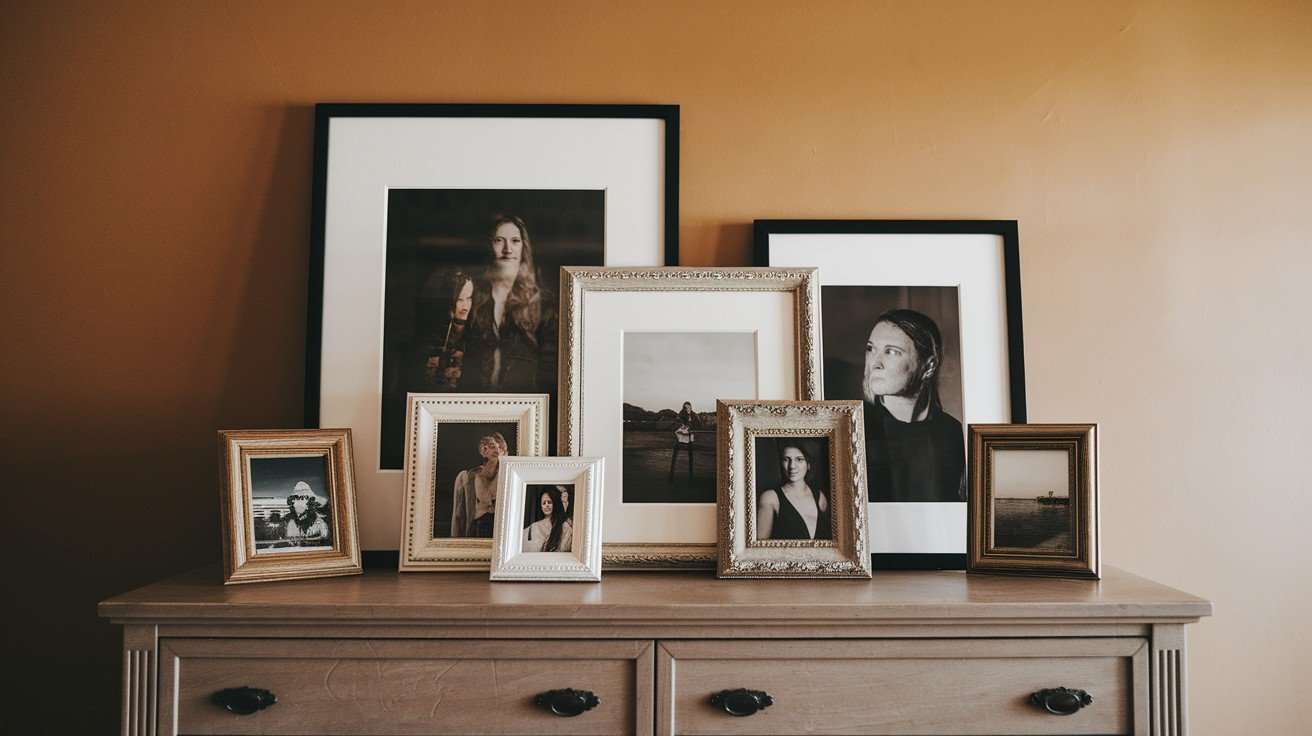
I mix hanging and leaning art pieces because they create depth without looking messy. I hang one or two medium pieces on the wall behind my dresser, then lean smaller frames against the wall on the dresser surface itself.
The key is varying the sizes. Big frame in the back, a medium frame in front, a tiny frame to the side. Your eye moves around naturally, which keeps things interesting. I use odd numbers like 3 or 5 pieces, mix frame colors and materials, and leave breathing room between each piece.
Here’s where people mess up. They either hang everything or lean everything. The magic happens when you combine both approaches. I start with the wall pieces first, then add the leaning frames one by one. If it starts looking crowded, I remove something.
My favorite combo? A medium black-and-white photo hung on the wall with two smaller colorful prints leaning in front. The contrast works perfectly.
Pro tip: Change out the leaning pieces seasonally. It’s an easy way to refresh your space without buying new furniture. Your dresser becomes a rotating gallery that tells your story.
4. Natural Accents
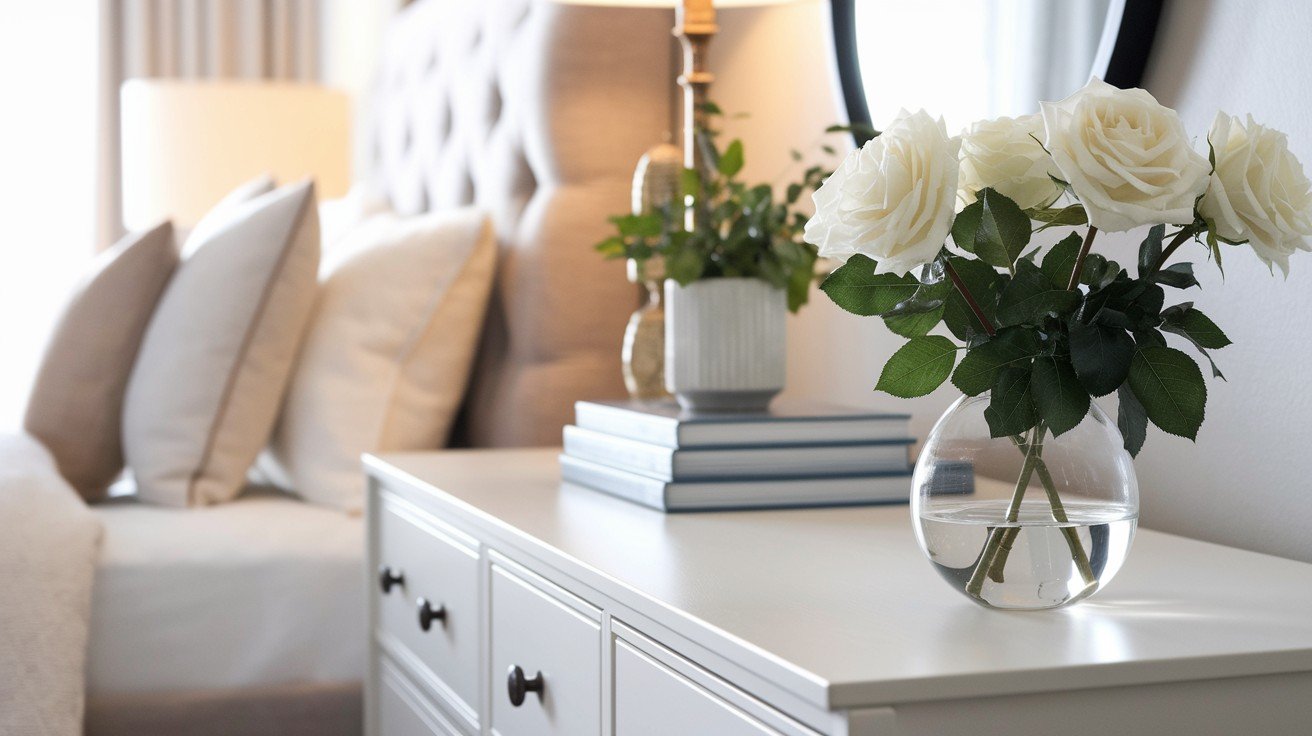
I always add something living to my dresser because plants change everything. A single potted plant softens hard edges and adds color, making your dresser feel like part of your home instead of just furniture.
Here are my go-to options: A small snake plant (almost impossible to kill), fresh flowers in a simple vase, decorative branches from the yard, or a small succulent in a pretty pot. You don’t need a green thumb – I’ve killed more plants than I care to admit, but the impact is worth it.
My current favorite is the eucalyptus branches. They smell amazing, last for weeks, and look good in any vase. Plus, they’re cheap at the grocery store. Fresh flowers are special occasion magic – white roses make everything feel fancy, and sunflowers bring instant happiness.
I learned to keep it simple. One plant or one vase is enough because more than that looks like a garden center exploded. The living element makes your space feel fresh and cared for. It’s the difference between a room that looks staged and one that feels truly lived in.
5. Curated Tray Display
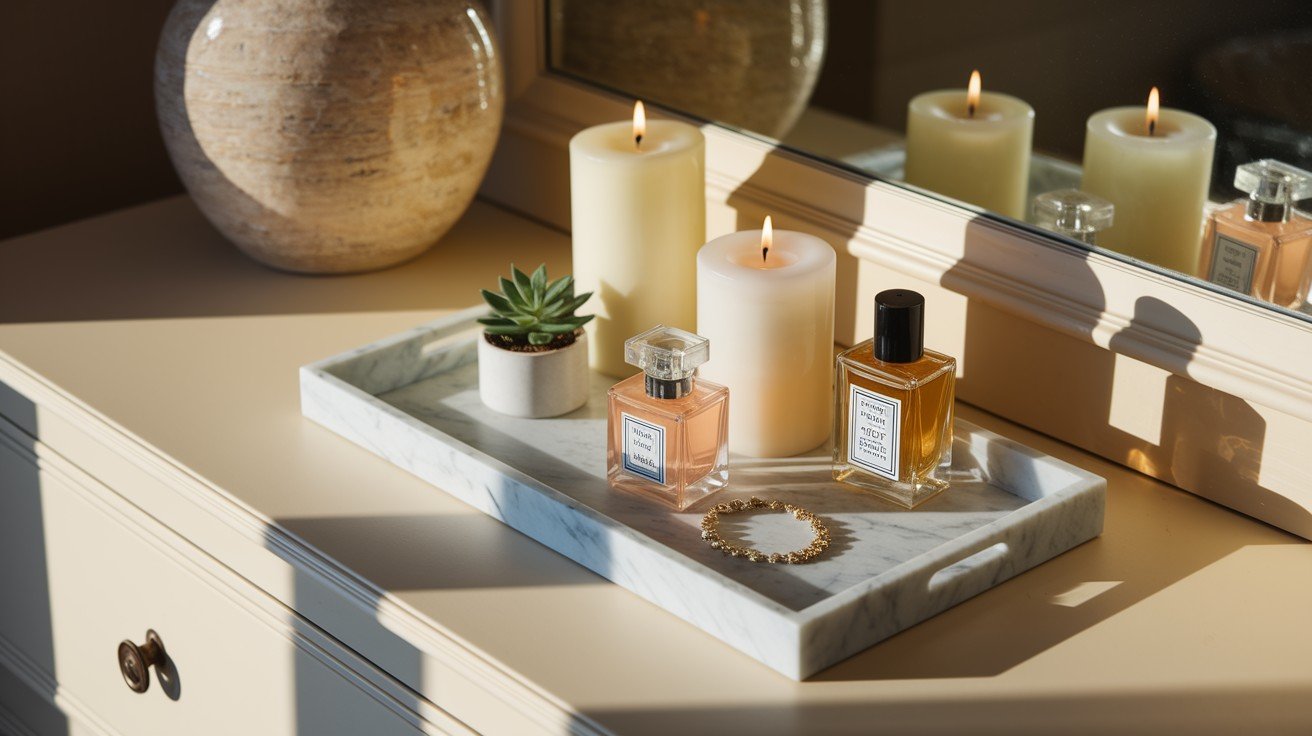
I use a decorative tray to corral my small items because it’s like drawing an invisible box around chaos. Without a tray, perfume bottles and candles look scattered. With a tray, the same items suddenly look intentional and styled.
What goes on my tray: 2-3 candles of different heights, my favorite perfume bottle, a small piece of jewelry, and maybe a tiny succulent. The tray itself matters – I choose materials that match my room, like marble for modern spaces, wood for warm vibes, or metal for industrial looks.
Here’s my rule: Fill the tray about 70% full. Too empty looks sad, too full looks messy. The sweet spot is almost full with room to breathe. I change what’s on the tray based on my mood or the season – holiday candles in December, fresh flowers in spring, beach shells in summer.
The best part? Everything has a home now. No more hunting for my rings or wondering where I left that candle. The tray keeps my daily essentials organized while making them look like intentional decor. Your dresser goes from cluttered to curated with one simple tray.
6. Books + Sculptural Decor
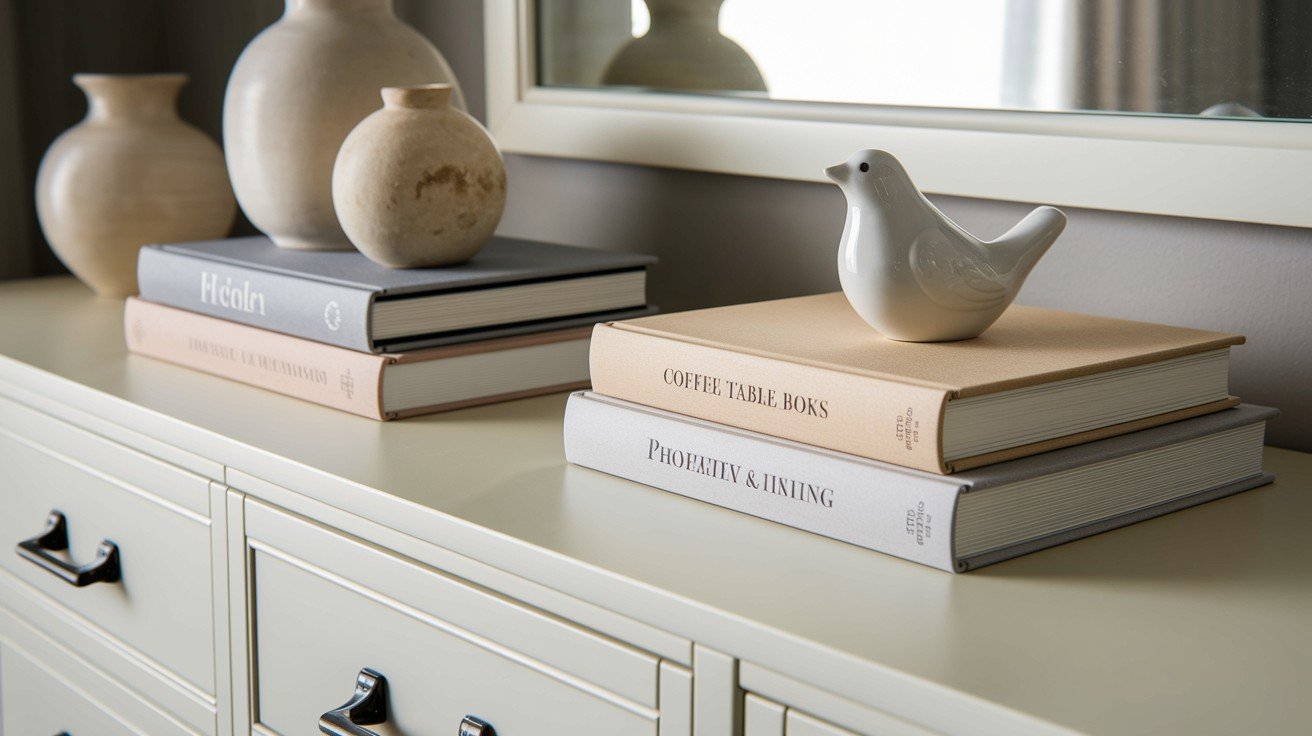
I stack coffee table books and put something pretty on top because it’s the easiest way to add height and interest. The books become pedestals for small art pieces, giving your dresser layers instead of everything sitting at the same level.
My book stacking formula: 2-3 books maximum, biggest book on bottom, smallest on top, and mix horizontal and vertical orientations. What goes on top? Small ceramic bowls, tiny sculptures, interesting rocks, or vintage collectibles. The key is choosing something with a personality that makes you smile.
The books don’t have to match your decor perfectly, but they should look intentional. I avoid books with damaged covers or obvious garage sale finds. My current stack has a photography book on the bottom, a cooking book in the middle, and a small white ceramic bird on top. The height difference creates a visual rhythm.
Pro move: Choose books you want to flip through. Sometimes I grab the cooking book when planning dinner, and that’s perfectly fine. Functional decor is the best kind. The book-and-object combo fills vertical space and gives your eye somewhere interesting to land. Your dresser becomes more than storage – it becomes a display.
7. Seasonal or Themed Vignettes
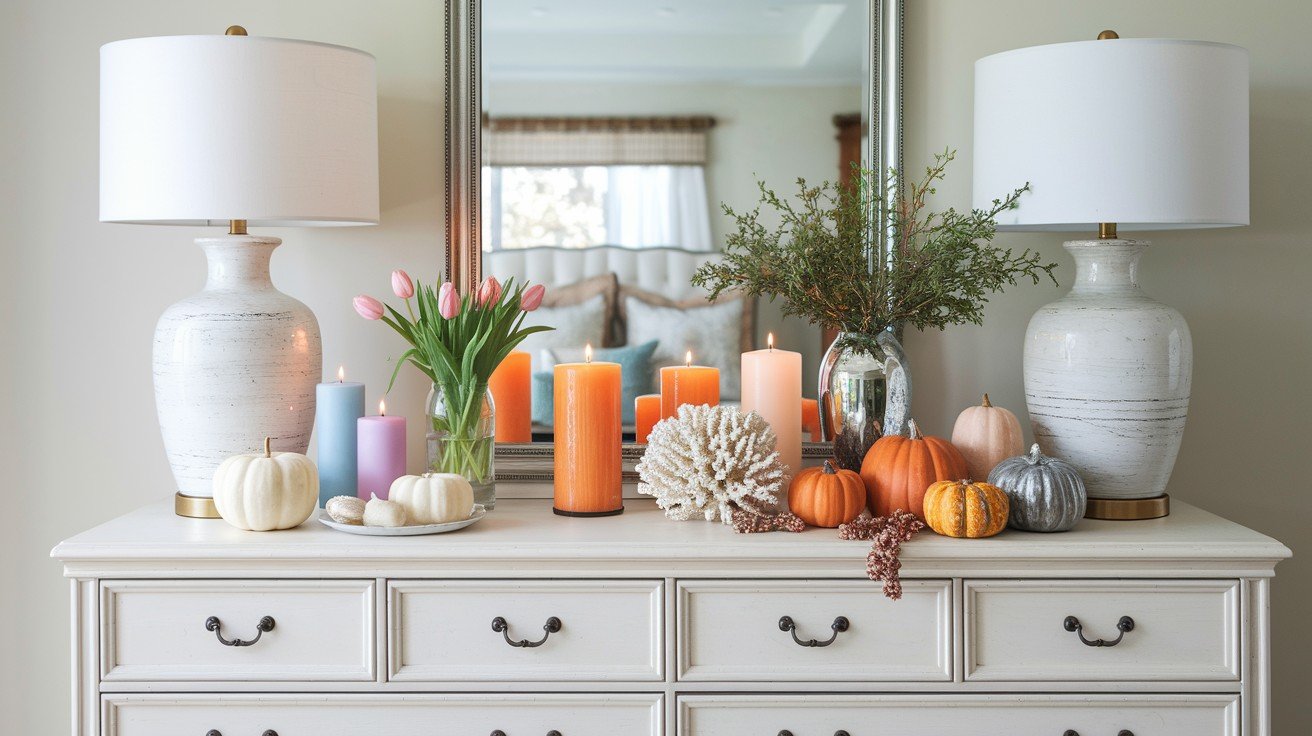
I changed my dresser decor with the seasons because it keeps my room feeling fresh without buying new furniture. Spring means fresh flowers and light colors, summer brings shells and bright candles, fall gets cozy items and mini pumpkins, and winter calls for evergreen branches and metallic accents.
The trick is keeping some base items year-round. My mirror and lamps stay put, the tray remains the same, and I only swap out 2-3 small pieces to match the season. This approach saves money, too – instead of redecorating the whole room, I focus on my dresser.
My seasonal swaps: Spring tulips and pastel candles, summer beach glass and coral pieces, fall gourds and amber candles, winter pine branches and silver frames. A $5 bunch of sunflowers instantly makes summer happen. Fall leaves from the yard cost nothing.
I store seasonal items in a small box under my bed. When the weather changes, I spend 10 minutes swapping things out. It’s like getting a new room four times a year. Your space always feels current and intentional, and your dresser becomes a calendar that reflects the world outside.
Conclusion
You now have 7 proven ways to transform your master bedroom dresser. Pick the style that speaks to you. Start with one idea and build from there.
Remember, great dresser styling isn’t about perfection. It’s about creating a space that makes you smile every morning. Your bedroom should feel like you.
Don’t overthink it. Clear that dresser top right now. Choose your favorite mirror or artwork. Add one beautiful item that brings you joy.
The best part? You can change things up anytime. Swap out flowers for the season. Move items around until they feel right. Your dresser, your rules.
Start today. Your future self will thank you every time you walk into that beautifully styled bedroom. You’ve got this.
Frequently Asked Questions
How many items should I place on my master bedroom dresser?
Keep 3-5 key pieces maximum. Focus on one tall item, one mirror, and 2-3 smaller decorative elements for a balanced composition.
What’s the best mirror size for above a dresser?
Choose mirrors 2/3 the width of your dresser. For tall dressers, center it; for wide dressers, offset to one side.
Can I mix different decorating styles on my dresser?
Yes, but limit to 2-3 complementary styles. Mix vintage with modern or rustic with contemporary for an interesting contrast without chaos.
How do I keep my dresser top organized daily?
Use decorative trays and bowls for jewelry, keys, and small items. Designate specific spots for daily essentials to maintain styling.
What’s the biggest mistake when decorating a dresser?
Overcrowding the surface. Leave 30-40% negative space, avoid tiny scattered items, and choose fewer high-impact pieces over many small ones.